.NET MAUI 알아보기 1장 - 환경 설치, 프로젝트 구조
.NET MAUI
이 포스트는 .NET 유튜브 채널의 .NET MAUI for Beginners 코스를 수강하면서 만든 포스트입니다. (https://www.youtube.com/playlist?list=PLdo4fOcmZ0oUBAdL2NwBpDs32zwGqb9DY)
포스트에 작성한 코드는 제 깃헙에 있습니다.(https://github.com/momo1108/TestMauiApp)
데스크탑 앱을 만들기 위해서 알아본 프레임워크이다. 공부한 내용을 정리해놓으려고 한다.
Build Cross-Platform Native Application with .NET MAUI
- Desktop
- Mobile
마이크로소프트에서 만든 프레임워크. 같은 코드 베이스를 이용해 Window, Mac, Android, ios 에서 사용 가능한 애플리케이션을 만들 수 있다.
Visual Studio 에서 생산적인 Tooling을 제공한다.
튜토리얼에서 진행할 내용
- .NET MAUI 프로젝트 만들기
- UI 만들기
- Advanced MVVM Architecture & Data Binding
- Platform Integration
- Navigation
- and More..
MAUI에서는 C#을 이용해 native API에 접근할 수 있다.
XAML(XML 기반 Markup. 데이터 바인딩 기능 등을 가지고있다) 을 이용해 native cross-platform user interface 를 개발하거나, 순수 C# 으로 개발할 수 있다.
우리가 어떤 코드를 작성하든(ex. 버튼, 스피너, 슬라이더 등) .NET MAUI는 native control을 생성하고 렌더링한다.
Platform별로 활용되는 것들
- ios : UIKit
- Android : Widgets
- MacOS : Catalyst
- Windows : App SDK & WinUI 3
다시말해 같은 코드 베이스(Shared Code)로 다양한 플랫폼에 사용 가능한 개발(UI, Resources, Platform Features, Business Logic)을 할 수 있다.
Shared Business Logic
- Models
- View Models
- RESTful Service Calls
- Databases
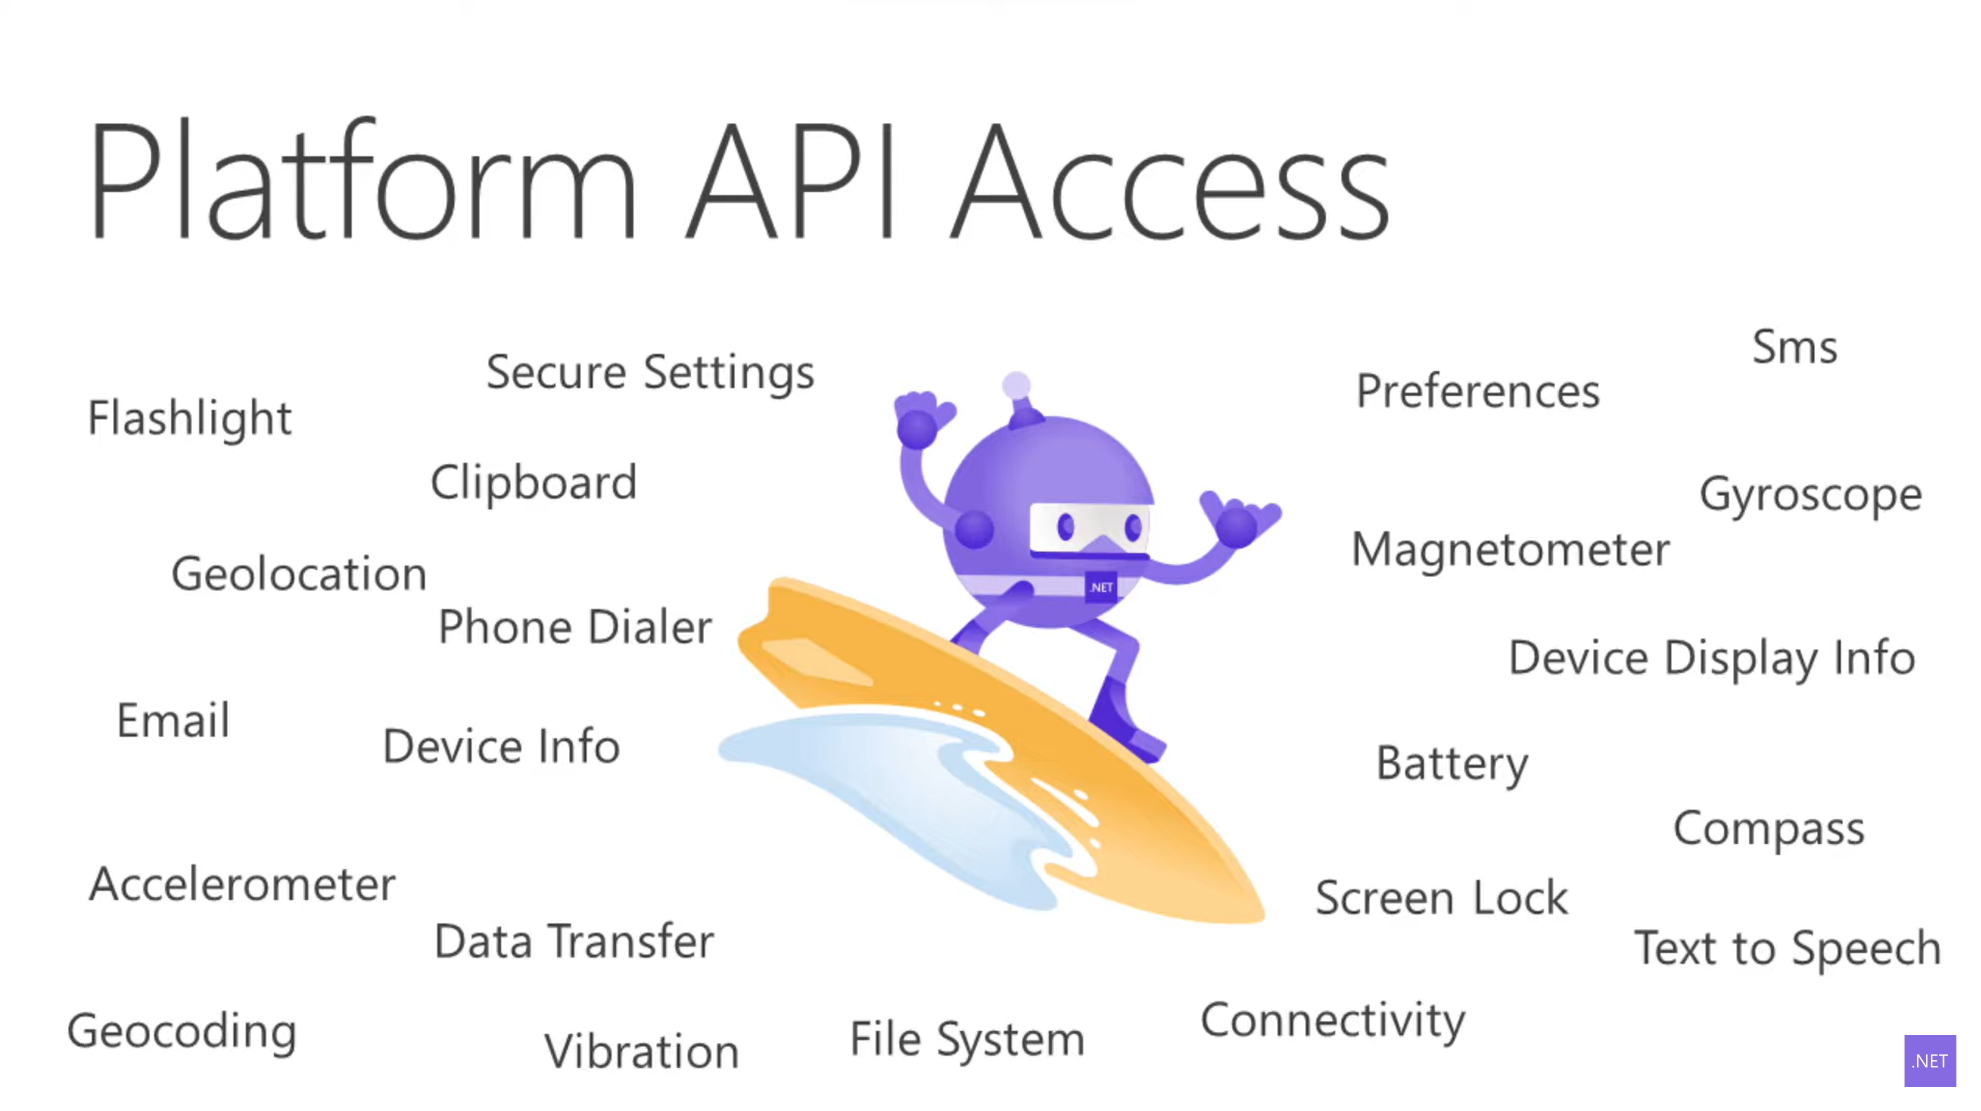
.NET MAUI는 UI 뿐 아니라 다양한 Platform API들을 지원해준다.
위처럼 다양한 API들을 하나의 Common API로 사용할 수 있다.
설치
Visual Studio 2022 Community 인스톨러를 사용해 설치한다. .NET MAUI 체크 후 설치
프로젝트 생성
템플릿은 .NET MAUI App 선택 후 프로젝트를 생성한다.
샘플 프로젝트를 실행해 보기 위해서는 윈도우의 경우 시스템 - 개발자용 - 개발자모드 를 활성화해야 한다.
생성한 프로젝트를 Solution Explorer 에서 더블 클릭해보면 프로젝트 시스템에 cross platform 기능들이 직접 빌드된걸 볼 수 있다.
TargetFramework 에 다양한 platform(Tizen - 삼성과 여러회사가 같이 개발한 운영체제)들이 있다.
프로젝트 생성 후 Dependencies를 살펴보면 모든 Platform 의 dependency가 존재하는 걸 볼 수 있다.
아래의 코드처럼 cross platform 에 공유되는 app 정보가 설정되어있다.
1
2
3
4
5
6
7
8
9
<!-- Display name -->
<ApplicationTitle>TestMauiApp</ApplicationTitle>

<!-- App Identifier -->
<ApplicationId>com.companyname.testmauiapp</ApplicationId>

<!-- Versions -->
<ApplicationDisplayVersion>1.0</ApplicationDisplayVersion>
<ApplicationVersion>1</ApplicationVersion>
이런 정보들을 한곳에 정의해놓고 각 플랫폼에 자동으로 cascade down되어 compile 하고 deploy 할 때 자동으로 세팅한다.
1
2
3
4
5
6
<SupportedOSPlatformVersion Condition="$([MSBuild]::GetTargetPlatformIdentifier('$(TargetFramework)')) == 'ios'">11.0</SupportedOSPlatformVersion>
<SupportedOSPlatformVersion Condition="$([MSBuild]::GetTargetPlatformIdentifier('$(TargetFramework)')) == 'maccatalyst'">13.1</SupportedOSPlatformVersion>
<SupportedOSPlatformVersion Condition="$([MSBuild]::GetTargetPlatformIdentifier('$(TargetFramework)')) == 'android'">21.0</SupportedOSPlatformVersion>
<SupportedOSPlatformVersion Condition="$([MSBuild]::GetTargetPlatformIdentifier('$(TargetFramework)')) == 'windows'">10.0.17763.0</SupportedOSPlatformVersion>
<TargetPlatformMinVersion Condition="$([MSBuild]::GetTargetPlatformIdentifier('$(TargetFramework)')) == 'windows'">10.0.17763.0</TargetPlatformMinVersion>
<SupportedOSPlatformVersion Condition="$([MSBuild]::GetTargetPlatformIdentifier('$(TargetFramework)')) == 'tizen'">6.5</SupportedOSPlatformVersion>
이런식으로 사용 가능한 OS 버전도 명시가 가능하다.
ItemGroup을 보면 자동 생성되는 크로스 플랫폼 앱 리소스들이 존재한다.
1
2
3
4
5
6
7
8
9
10
11
12
13
14
15
16
17
<ItemGroup>
	<!-- App Icon -->
	<MauiIcon Include="Resources\AppIcon\appicon.svg" ForegroundFile="Resources\AppIcon\appiconfg.svg" Color="#512BD4" />

	<!-- Splash Screen -->
	<MauiSplashScreen Include="Resources\Splash\splash.svg" Color="#512BD4" BaseSize="128,128" />

	<!-- Images -->
	<MauiImage Include="Resources\Images\*" />
	<MauiImage Update="Resources\Images\dotnet_bot.png" Resize="True" BaseSize="300,185" />

	<!-- Custom Fonts -->
	<MauiFont Include="Resources\Fonts\*" />

	<!-- Raw Assets (also remove the "Resources\Raw" prefix) -->
	<MauiAsset Include="Resources\Raw\**" LogicalName="%(RecursiveDir)%(Filename)%(Extension)" />
</ItemGroup>
폰트와 이미지 설정, 사이즈 조절(svg도 가능) 등 다양한 작업도 가능하다.
프로젝트 구조
생성되는 프로젝트의 기본적인 구조를 몇몇 살펴보자.
Platforms
Platforms 폴더는 개발자들에게 특정 플랫폼 별 native api를 접근할 수 있게 해준다.
각 플랫폼 폴더별로 scaffolding code(프로토타입, 테스트용 코드)가 있다.
예를 들어 안드로이드폴더의 AndroidManifest.xml에는 여러 permission 이라던가 app resource를 정의하고 있다.
MainActivity.cs 같은 startup code 들도 있다. 사람이 보기 편하게 최대한 압축해놓은 상태이다.
만약 특정 플랫폼에서 무언가를 변경하고 싶다면 이 폴더에서 하면된다.
Resources
cross-platform 간 공유하는 resource들이 들어있다.
ex. 폰트, 이미지, raw assets
이런 리소스들을 .NET MAUI가 플랫폼 별로 컴파일 시 맞는 위치에 놓아준다.
AppIcon 처럼 svg 파일을 각 플랫폼에 맞게 .png 변환 후 스케일링을 하는 등의 작업같은 것들도 해준다.
MauiProgram.cs
어플리케이션의 시작은 MauiProgram.cs 이다.
1
2
3
4
5
6
7
8
9
10
11
12
13
14
15
16
17
18
19
20
21
22
23
24
25
using Microsoft.Extensions.Logging;

namespace TestMauiApp
{
    public static class MauiProgram
    {
        public static MauiApp CreateMauiApp()
        {
            var builder = MauiApp.CreateBuilder();
            builder
                .UseMauiApp<App>()
                .ConfigureFonts(fonts =>
                {
                    fonts.AddFont("OpenSans-Regular.ttf", "OpenSansRegular");
                    fonts.AddFont("OpenSans-Semibold.ttf", "OpenSansSemibold");
                });

#if DEBUG
    		builder.Logging.AddDebug();
#endif

            return builder.Build();
        }
    }
}
MauiProgram 클래스 내의 CreateMauiApp 이 실행되고 MauiApp 이 return 된다.
내부 코드의 첫 줄에서는 Builder를 생성하는데 ASP.NET Core와 비슷한 구조를 가진다.
다음 코드는 빌더에게 이 App을 사용한다고 알려주고 font를 설정한다.
이쪽 코드에서 추가적인 configure가 가능한데, 예를들어 activity lifecycle, service, dependency service 등이 있다.
App.xaml
앱 내부에는 뭐가 있을까?
App.xaml 에 들어가보면 Resources/Styles/Colors.xaml, Resources/Styles/Styles.xaml 등의 App-wide Resource 들이 있는걸 볼 수 있다.
1
2
3
4
5
6
7
8
9
10
11
12
13
14
<?xml version = "1.0" encoding = "UTF-8" ?>
<Application xmlns="http://schemas.microsoft.com/dotnet/2021/maui"
             xmlns:x="http://schemas.microsoft.com/winfx/2009/xaml"
             xmlns:local="clr-namespace:TestMauiApp"
             x:Class="TestMauiApp.App">
    <Application.Resources>
        <ResourceDictionary>
            <ResourceDictionary.MergedDictionaries>
                <ResourceDictionary Source="Resources/Styles/Colors.xaml" />
                <ResourceDictionary Source="Resources/Styles/Styles.xaml" />
            </ResourceDictionary.MergedDictionaries>
        </ResourceDictionary>
    </Application.Resources>
</Application>
Colors.xaml 에는 다양한 색상이 정의되어있고, Styles.xaml 에는 이런 색상정보를 활용한 테마 등이 설정되어있기 때문에 Colors.xaml 을 조금만 수정해줘도 다양한 변화를 줄 수 있다.
Visual Studio 에서 App.xaml 파일의 왼쪽 화살표 버튼을 눌러보면 App.xaml.cs 가 있다. 이런 것을 보통 code behind 라고 부른다. 모든 xaml.cs 는 xaml과 연관되어 있다고 보면 된다.
1
2
3
4
5
6
7
8
9
10
11
12
namespace TestMauiApp
{
    public partial class App : Application
    {
        public App()
        {
            InitializeComponent();

            MainPage = new AppShell();
        }
    }
}
내부의 코드를 보면 어플리케이션의 메인 페이지가 AppShell로 셋되는 것을 볼 수 있다. AppShell은 무엇일까?
나의 어플리케이션에 특화된 Shell이라고 보면 된다.
AppShell 의 장점은 어플리케이션이 로드될 때 Template 을 lazily load 할 수 있게 해준다는 것이다.
1
2
3
4
5
6
7
8
9
10
11
12
13
14
15
<?xml version="1.0" encoding="UTF-8" ?>
<Shell
    x:Class="TestMauiApp.AppShell"
    xmlns="http://schemas.microsoft.com/dotnet/2021/maui"
    xmlns:x="http://schemas.microsoft.com/winfx/2009/xaml"
    xmlns:local="clr-namespace:TestMauiApp"
    Shell.FlyoutBehavior="Disabled"
    Title="TestMauiApp">

    <ShellContent
        Title="Home"
        ContentTemplate="{DataTemplate local:MainPage}"
        Route="MainPage" />

</Shell>
startup code에는 현재 페이지를 나타내는 Single shell piece of content 가 사용되고 있다.
여기에 그냥 item을 추가함으로서 쉽게 flyout navigation(<FlyoutItem>) 이나 top, bottom tab(Tab, TabBar) 외에도 메뉴 등을 추가할 수 있다.
이는 아주 유연한 방식이며 eye-based navigation 이 가능하다.
startup 코드에는 앱의 Route 가 MainPage 로 설정되어 있으며 이게 나의 MainRoute가 되는 것이다. ContentTemplate 에 MainPage 가 있고 Home 으로 Title 이 설정되어 있다.
이 MainPage(MainPage.xaml) 를 찾아가보면 ContentPage > ScrollView > VerticalStackLayout > 이미지, 라벨, 버튼 의 구조로 이루어져있다.
이 페이지 또한 code behind(MainPage.xaml.cs)를 보면 startup code가 존재한다.
1
2
3
4
5
6
7
8
9
10
11
12
13
14
15
16
17
18
19
20
21
22
23
24
25
namespace TestMauiApp
{
    public partial class MainPage : ContentPage
    {
        int count = 0;

        public MainPage()
        {
            InitializeComponent();
        }

        private void OnCounterClicked(object sender, EventArgs e)
        {
            count++;

            if (count == 1)
                CounterBtn.Text = $"Clicked {count} time";
            else
                CounterBtn.Text = $"Clicked {count} times";

            SemanticScreenReader.Announce(CounterBtn.Text);
        }
    }

}
버튼 클릭횟수를 저장할 count 필드와 onclick 이벤트 핸들러 함수가 정의되어있다.
전체적인 구조를 알아보았으니 어플리케이션을 실행해보자.
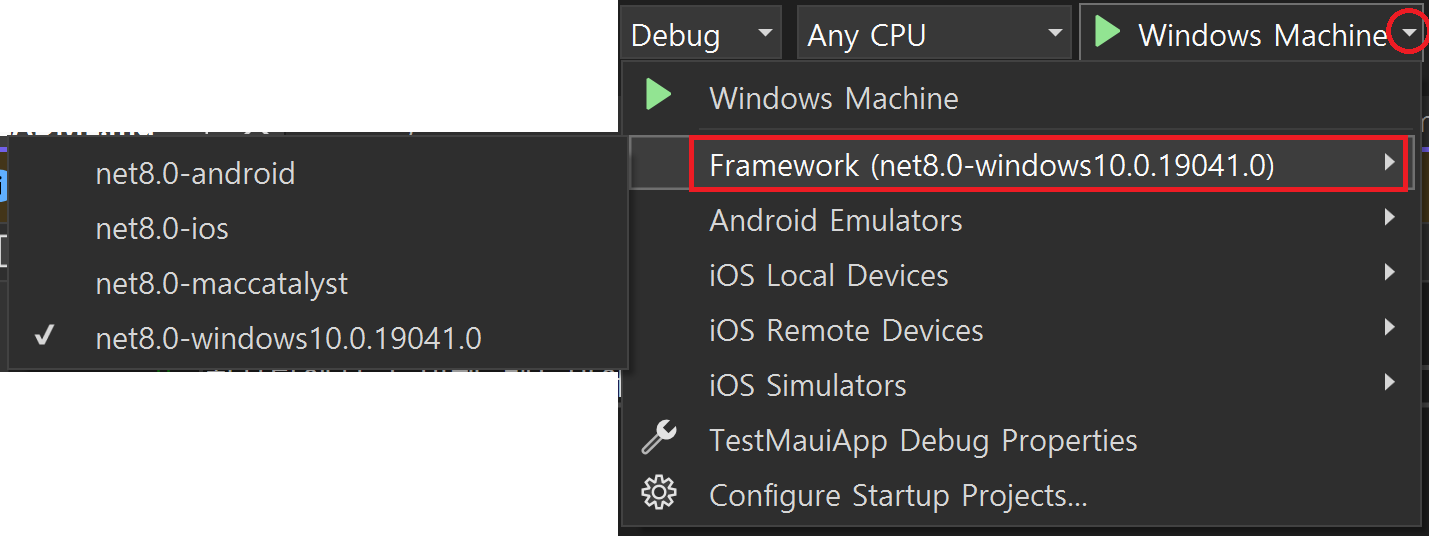
최상단에서 두번째 메뉴바에 실행관련 버튼에서 dropdown 을 눌러보면 실행할 수 있는 Framework 메뉴가 있다.
Windows 11 은 내부적으로 Windows의 Android Subsystem을 사용해 Android 에뮬레이터를 사용할 필요 없이 디버깅이 가능하다. 이를 이용해 Windows 11 기기에서 바로 Windows 와 Android deploy가 가능하다.
Windows 10 이어도 Tools - Android - Android Device Manager 를 지원해주기 때문에 걱정할 필요 없다.(https://learn.microsoft.com/ko-kr/xamarin/android/get-started/installation/android-emulator/#Hardware_Acceleration)
세팅에 있어서 가속 설정이 좀 어려운데, 문서들을 참조해서 잘 따라가보자.(https://learn.microsoft.com/ko-kr/xamarin/android/get-started/installation/android-emulator/hardware-acceleration?pivots=windows)
왜 했는데도 느리지??????????????????? 실행되고 나서 내부 동작만 빨라지나?
그 외에 Windows Home edition에서는 쓸 수 없는 기능들을 사용할 수 있게 스크립트를 작성하는 방법들도 있더라.
- Hyper V : https://lastcard.tistory.com/141
- gpedit.msc : https://kiuas.tistory.com/9
iOS 의 경우에는 2가지 어플리케이션 배포 방법이 있다.(강의 영상 날짜 기준 22.6.2)
- Mac 에 원격 접속(connect remotely)을 하고 remoted simulator 를 통해 debug 와 deploy
- Windows Machine 에 직접적으로 iOS 기기를 plug 하고 iOS Hot Restart 사용해 그 기기에 직접적으로 deploy 할 수 있다.(단, Apple Developer Account 가 필요)
Mac 은 Mac 기기를 사용해서만 deploy 를 해야한다. 해당 문서를 따로 살펴보자.
실행해보기
여기까지 확인해본 내용을 토대로 직접 실행을 해보자.
일단 Windows Framework 를 선택 후 F5 를 눌러 실행!
만약 실행중인 창이 오버랩되는게 싫다면 Visual Studio 내부의 Preview 기능을 활용가능하다.(우측의 세로 메뉴 선택 후 Pin해서 고정)
좌측의 Live Visual Tree 메뉴를 사용하면 어플리케이션 내부의 모든 content 들을 각각 Tree 형태로 출력해주고 클릭으로 해당 소스를 확인할 수 있다.
웹 브라우저의 개발자 도구 처럼 마우스오버하면 화면에 어떤 element 인지 표시도 해준다.
Resources
- .NET MAUI 도큐먼트 : https://learn.microsoft.com/ko-kr/dotnet/maui/?view=net-maui-8.0
- 좋은 .NET MAUI 라이브러리, 리소스가 정리된 깃헙(awesome-dotnet-maui) : https://github.com/jsuarezruiz/awesome-dotnet-maui

