.NET MAUI 알아보기 4장 - 배포, Windows에서 창 크기 고정
앞서서
이번 포스트에서는 작성한 어플리케이션을 실제로 배포하는 방법과, 번외로 Windows 플랫폼에서 창 크기를 고정하는 방법을 알아보자.
Windows 환경에서 창 크기 고정
윈도우 환경에서만 창의 크기를 고정하고 싶은 경우에는 어떻게 해야할까?
구글링을 해본 결과, 대부분의 답변이 Platforms/Windows 경로에서 코드를 작성하고있었다. 여기에 있는 코드가 플랫폼별로 따로 빌드되는 것이니 당연한건가?
어쨌든 방법을 살펴보니, Windows 플랫폼의 폴더에 있는 App.xaml 의 code behind, 즉 App.xaml.cs 에서 관련 조작이 진행되더라.
1
2
3
4
5
6
7
8
9
10
11
12
13
14
15
16
17
18
19
20
21
22
23
24
25
26
27
28
29
30
31
32
33
34
35
36
37
38
39
40
41
42
43
44
45
46
47
48
49
50
51
52
53
54
55
56
57
58
59
60
61
62
63
64
65
66
67
68
69
70
using Microsoft.UI;
using Microsoft.UI.Windowing;
using Microsoft.UI.Xaml;
using Windows.Graphics;
using WinRT.Interop;

// To learn more about WinUI, the WinUI project structure,
// and more about our project templates, see: http://aka.ms/winui-project-info.

namespace TestMauiApp.WinUI
{
    /// <summary>
    /// Provides application-specific behavior to supplement the default Application class.
    /// </summary>
    public partial class App : MauiWinUIApplication
    {
        Microsoft.UI.Xaml.Window nativeWindow;
        int screenWidth, screenHeight;
        const int desiredWidth = 1000;
        const int desiredHeight = 1720;
        /// <summary>
        /// Initializes the singleton application object.  This is the first line of authored code
        /// executed, and as such is the logical equivalent of main() or WinMain().
        /// </summary>
        public App()
        {
            this.InitializeComponent();

            Microsoft.Maui.Handlers.WindowHandler.Mapper.AppendToMapping(nameof(IWindow), (handler, view) =>
            {
                IWindow mauiWindow = handler.VirtualView;
                nativeWindow = handler.PlatformView;
                nativeWindow.Activated += OnWindowActivated;
                nativeWindow.Activate();

                // allow Windows to draw a native titlebar which respects IsMaximizable/IsMinimizable
                nativeWindow.ExtendsContentIntoTitleBar = false;

                IntPtr windowHandle = WinRT.Interop.WindowNative.GetWindowHandle(nativeWindow);
                WindowId windowId = Microsoft.UI.Win32Interop.GetWindowIdFromWindow(windowHandle);
                AppWindow appWindow = Microsoft.UI.Windowing.AppWindow.GetFromWindowId(windowId);

                // set a specific window size
                appWindow.MoveAndResize(new RectInt32((screenWidth - desiredWidth) / 2, (screenHeight - desiredHeight) / 2, desiredWidth, desiredHeight));

                if (appWindow.Presenter is OverlappedPresenter p)
                {
                    p.IsResizable = false;
                    // these only have effect if XAML isn't responsible for drawing the titlebar.
                    p.IsMaximizable = false;
                    p.IsMinimizable = false;
                }
            });
        }


        private void OnWindowActivated(object sender, Microsoft.UI.Xaml.WindowActivatedEventArgs args)
        {
            // Retrieve the screen resolution
            var displayInfo = DeviceDisplay.Current.MainDisplayInfo;
            screenWidth = (int)displayInfo.Width;
            screenHeight = (int)displayInfo.Height;
            // Remove this event handler since it is not needed anymore
            nativeWindow.Activated -= OnWindowActivated;
        }

        protected override MauiApp CreateMauiApp() => MauiProgram.CreateMauiApp();
    }

}
배포하기
배포에 관련된 내용은 강의에 포함되어있지 않아서 도큐먼트를 보고 정리해보았다.(https://learn.microsoft.com/ko-kr/dotnet/maui/deployment/?view=net-maui-8.0)
Android
테스팅
안드로이드 플랫폼에 앱을 테스팅할수 있는 방법은 2가지가 있다.
첫번째는 강의에서 사용한 안드로이드 에뮬레이터를 사용하는 것이고, 두번째는 안드로이드 기기를 개발자 모드를 사용하도록 설정하고 개발 PC에 연결하는 것이다.
안드로이드 에뮬레이터는 Visual Studio 2022에서 계속 사용했으니 패스하고, 두번째방법을 알아보자.(https://learn.microsoft.com/ko-kr/dotnet/maui/android/device/setup?view=net-maui-8.0)
내 핸드폰은 갤럭시 S8이다. 삼성폰은 OS가 같을테니 참조바란다. 개발자 모드가 켜지지 않은 경우 1번부터 진행하면 된다.
- 설정 - 휴대전화 정보 - 소프트웨어 정보 - 빌드번호 7번 클릭 후 패턴입력
- 설정 - 개발자 옵션 - 디버깅 탭의 USB 디버깅 활성화
- PC에 안드로이드 기기 연결
- Visual Studio에서 Android Emulators 대신 Android Local Devies 에서 기기 선택
- 어플리케이션 실행(내 노트북에선 2~3분 걸렸음)
배포
아래의 이미지는 .NET MAUI 의 Android 앱 배포와 관련된 단계를 나타내는 다이어그램이다. 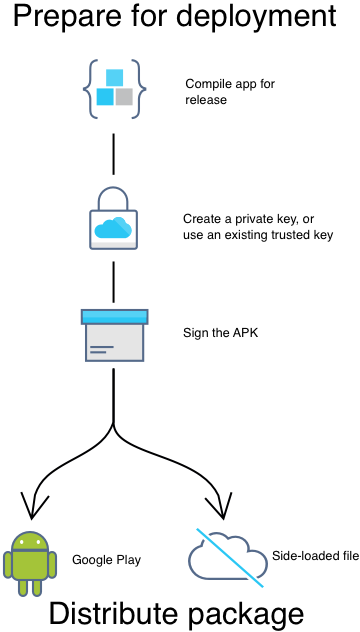
Android용 .NET MAUI 앱을 게시할 때 APK(Android 패키지) 또는 AAB(Android 앱 번들) 파일을 생성합니다. APK는 Android 디바이스에 앱을 설치하는 데 사용되며, AAB는 Google Play에 앱을 게시하는 데 사용됩니다.
배포 준비 단계는 별다를게 없고, 차이점은 배포 방법에 있다.
- Google Play 등 다양한 Android 마켓플레이스를 통해서 설치
- 웹 사이트의 링크를 클릭해서 설치
- 앱 패키지를 디바이스에 파일 공유를 통해서 설치
마켓 플레이스에 앱을 등록하기 위해서는 더 추가적인 프로세스가 필요하다.
일단 앱을 직접 설치해서 테스팅하는 방법부터 알아보자.
Solution Explorer 에서 프로젝트를 우클릭하고 속성(Properties) 메뉴로 들어가자.
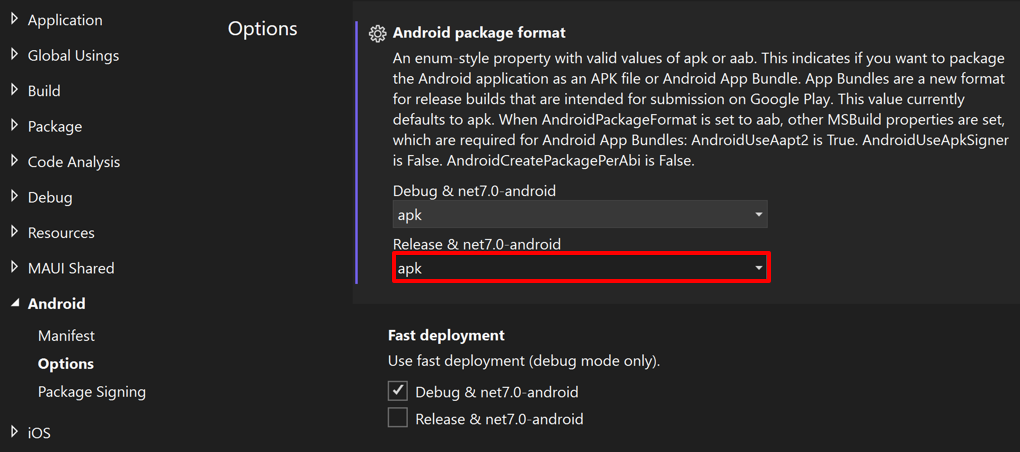
Android - Options - Android Package Format 의 Release 항목도
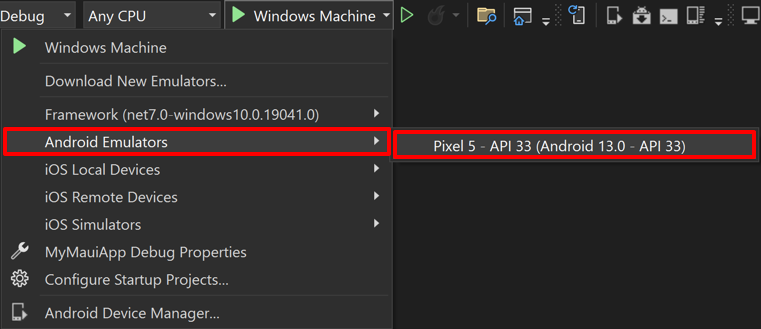
apk로 변경해주자.디버그 대상을 안드로이드 에뮬레이터에 생성한 가상 기기로 설정하자(ex. Pixel 5 - API 30)
Debug 항목을 드랍다운을 눌러서 Release 로 변경해준다.
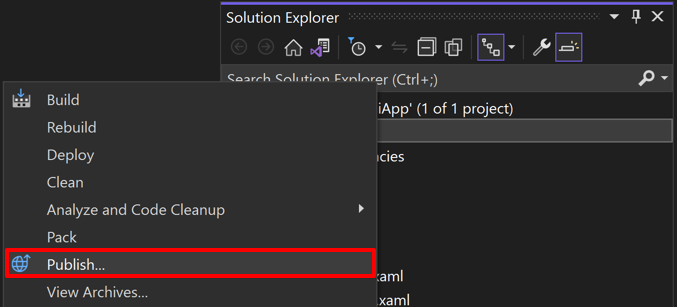
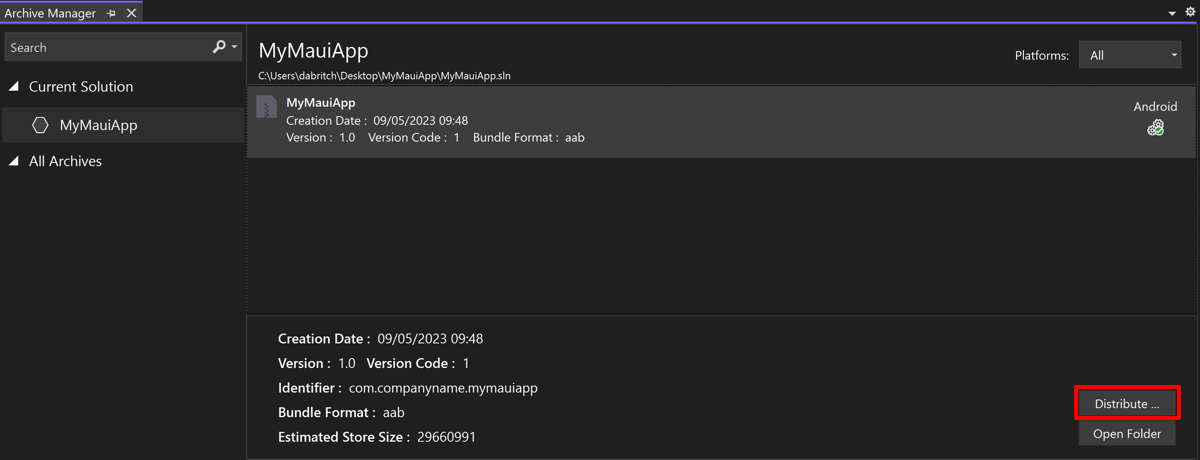
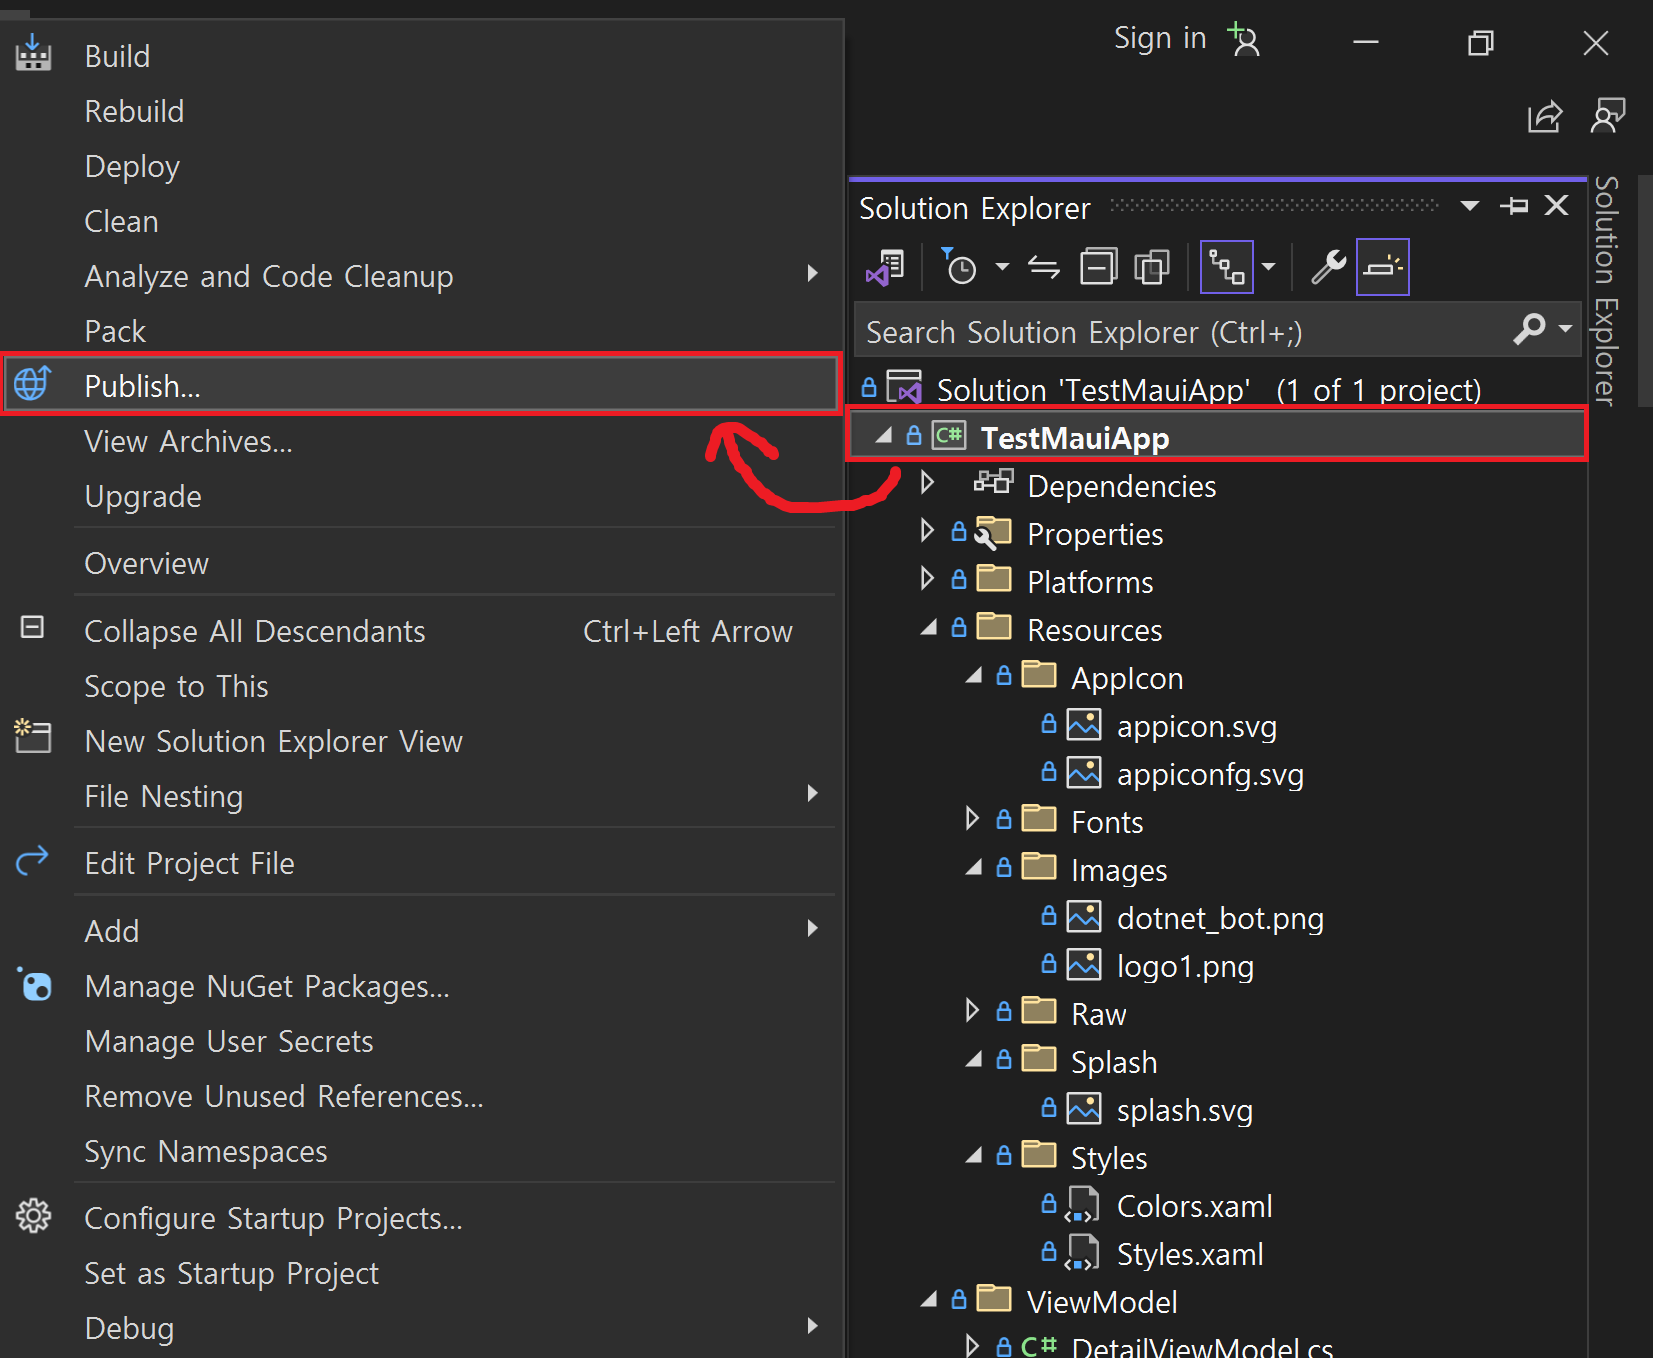
Solution Explorer 에서 프로젝트 우클릭 - Publish 선택하면 Archive Manager 가 앱을 Archive 한다.(노트북에서 한 4~5분 걸린듯)
Archiving이 끝나면 Distribute… 버튼 클릭
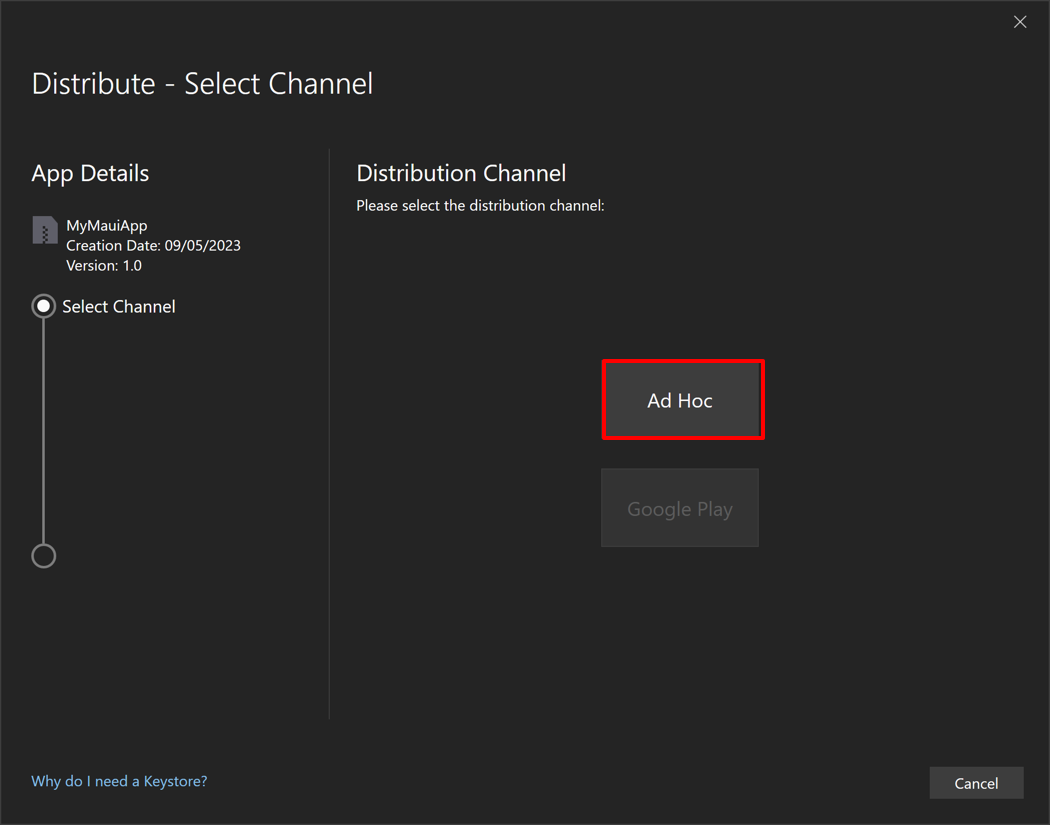
Select Channel 창에서 Ad Hoc 선택
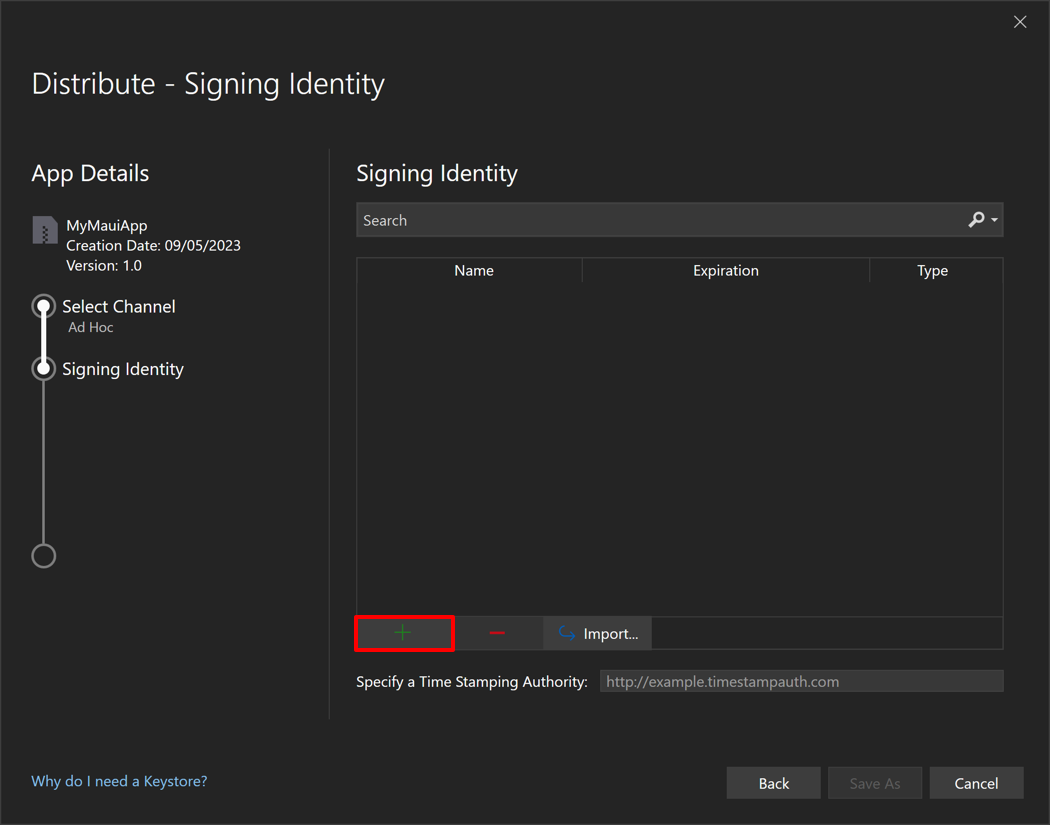
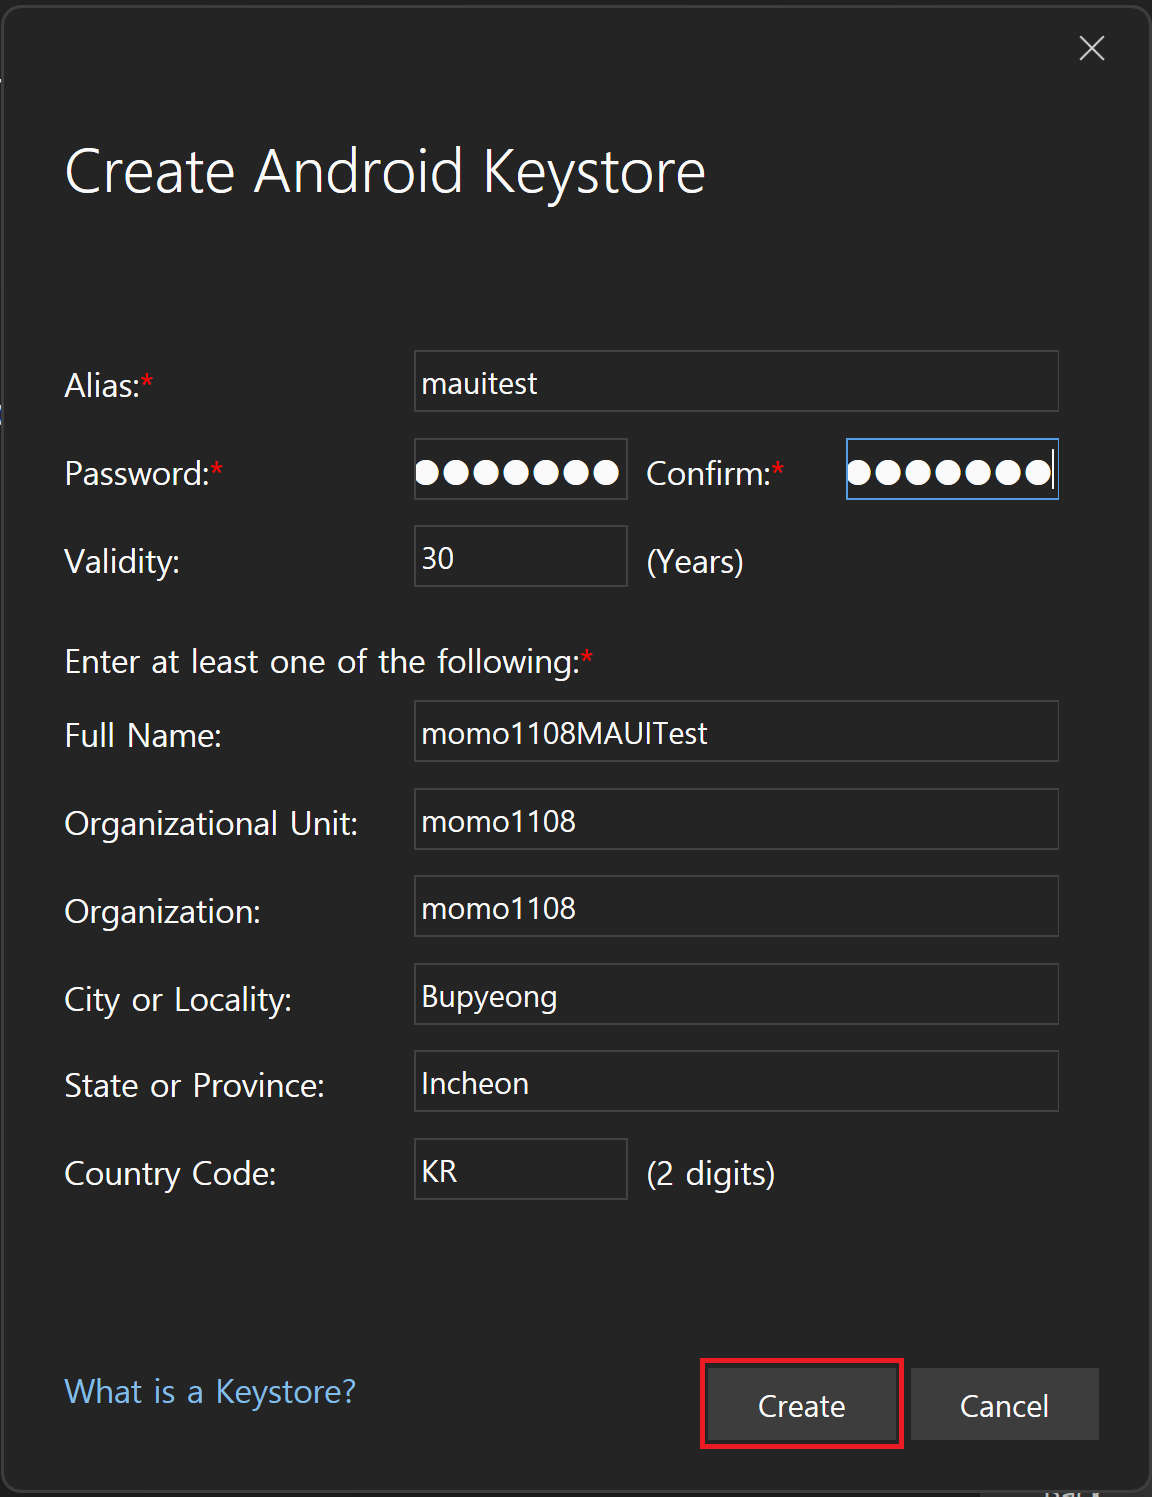
Signing Identity 선택창에서 나의 Signing Identity 를 새로 만든다.
입력 내용은 본인 마음대로 입력하고 생성하자. 난 패스워드도 똑같이 mauitest 로 설정함.
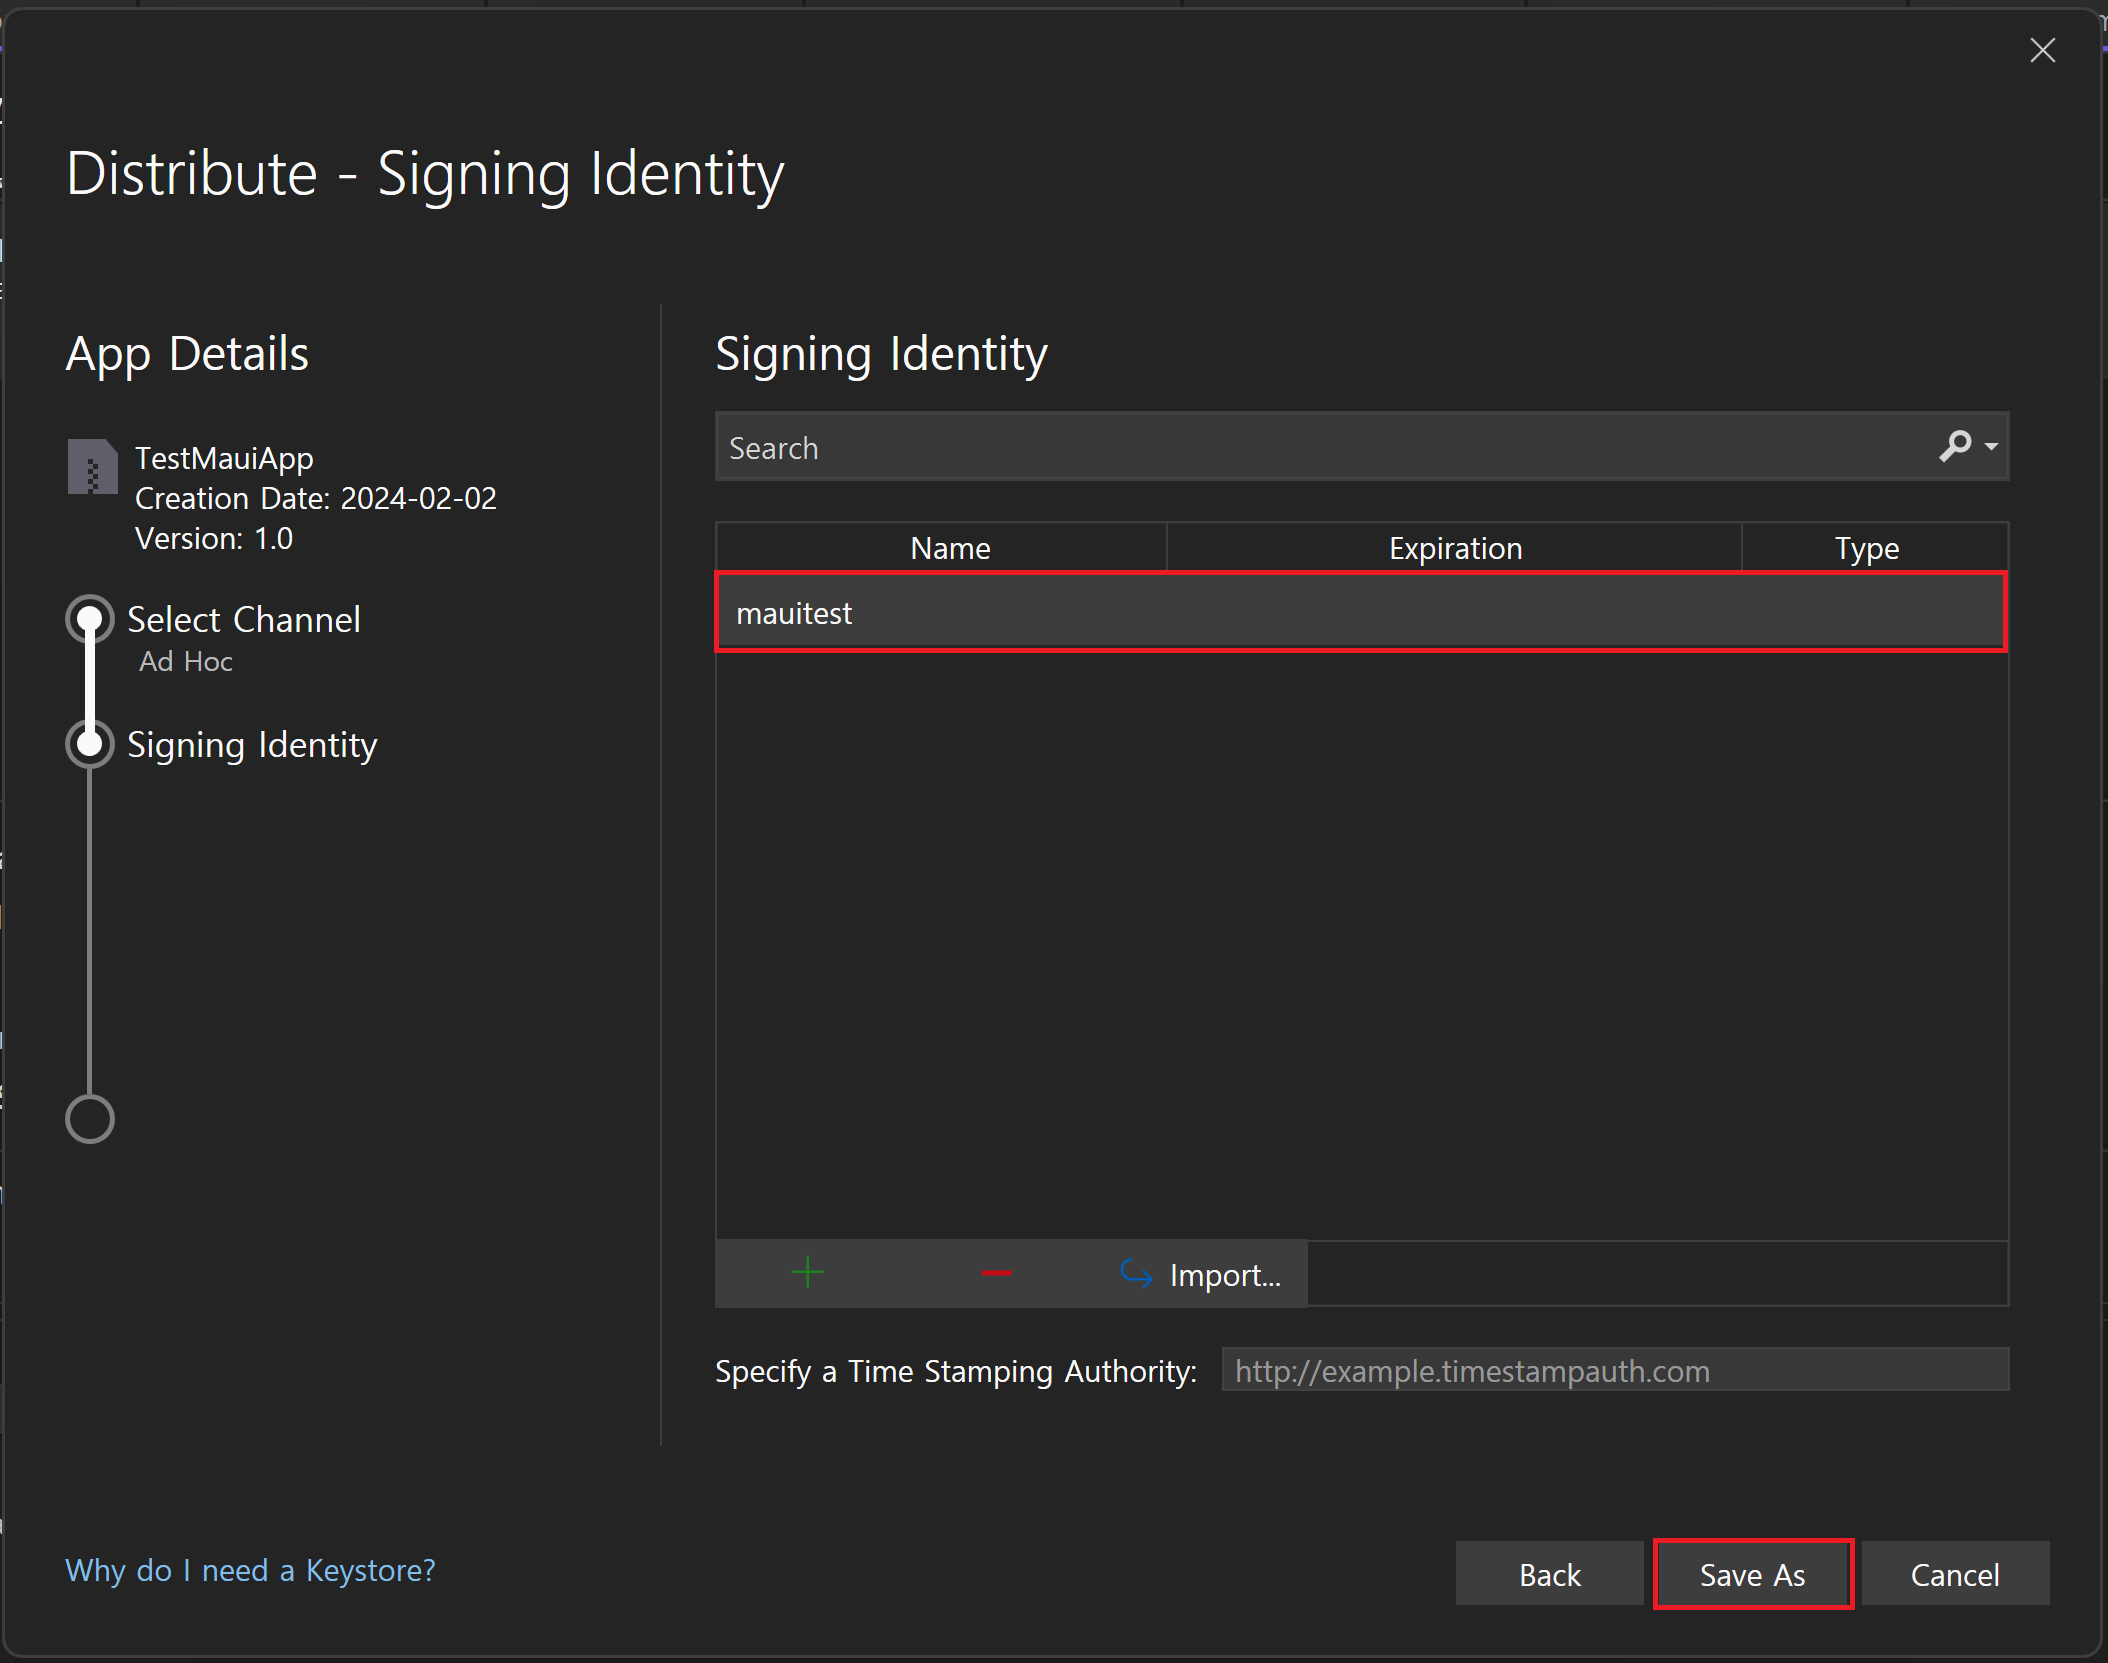
생성한 Signing Identity 선택 후 Save As 클릭
- 저장할 위치와 이름을 잘 확인 후 저장 - 패스워드 입력
- 안드로이드 기기의 보안 설정(내 경우 삼성 갤럭시 S8)은 설정 - 생체 인식 및 보안 - 출처를 알 수 없는 앱 설치 에서
내 파일허용 - 생성된 apk 파일은 핸드폰으로 옮겨서 본인 안드로이드 기기의 탐색기(내 핸드폰은
내 파일)에서 직접 실행하면 설치가 된다.
테스트 결과 내 핸드폰(갤럭시 S8)에는 설치가 되지 않았다.
뭔가 테스트한 안드로이드 에뮬레이터의 가상기기의 버전과 뭔가 맞지 않는게 있나보다.
다른 버전도 여러개 설정해봤는데, 이상하게도 디버그가 제대로 동작하질 않는다. 왜그러지…
Windows
윈도우에서의 배포에 대한 개요는 도큐먼트를 참조하자.(https://learn.microsoft.com/ko-kr/dotnet/maui/windows/deployment/overview?view=net-maui-8.0)
배포에는 몇가지 방법이 있는데, 먼저 .NET CLI 를 사용해 배포하는 방법과 Visual Studio 를 사용해 배포하는 방법이 있다.
또한 배포하는 앱의 형태도 MSIX 앱 패키지(packaged app) 또는 실행 파일(unpackaged app) 형태가 있다. MSIX 에 대한 내용은 관련 도큐먼트를 참조하자.(https://learn.microsoft.com/ko-kr/windows/msix/overview)
매니페스트
MSIX 앱 패키지의 경우, 프로젝트의 Platforms\Windows\Package.appxmanifest(매니페스트라 칭함) 파일에 의해 구성된다.
이 매니페스트는 우리 어플리케이션을 configure 하고 display 하기위한 역할로서 MSIX Installer, Microsoft Store, Windows 에서 사용된다.
.NET MAUI 에서는 어플리케이션 이름, 아이콘 등 크로스 플랫폼 공유 세팅을 사용하는데, 이는 build-time 에 매니페스트 안의 내용으로 세팅된다.
물론 이런 세팅들 외에도, 사용자들에게 좀더 나은 설치 관리자 환경을 제공하기 위해 앱 패키지를 구성하는데 사용되는 매니페스트를 수정해야 한다.
Microsoft Store 와 Windows 에서 앱이 어떻게 display 되는지 영향을 줄 Platforms\Windows\Package.appxmanifest 파일을 수정하는 방법으로는 Visual Studio 의 Manifest Designer 기능을 활용하는 방법, XML editor 를 사용하여 수정하는 방법이 있다.
Manifest Designer를 사용하려면,Solution Explorer에서Platforms\Windows\Package.appxmanifest을 우클릭하고Properties를 클릭한다.XML editor를 사용하려면,Solution Explorer에서Platforms\Windows\Package.appxmanifest을 우클릭하고View Code를 클릭한다.
도큐먼트에 명시된 참조사항
The Manifest Designer for .NET MAUI projects can’t edit app capabilities. For the time being, you’ll need to use the XML editor.
좀더 자세한 앱 매니페스트 세팅이 궁금하다면 App manifest schema reference 도큐먼트를 참조하자.
Visual Studio 를 사용하여 폴더에 배포하기
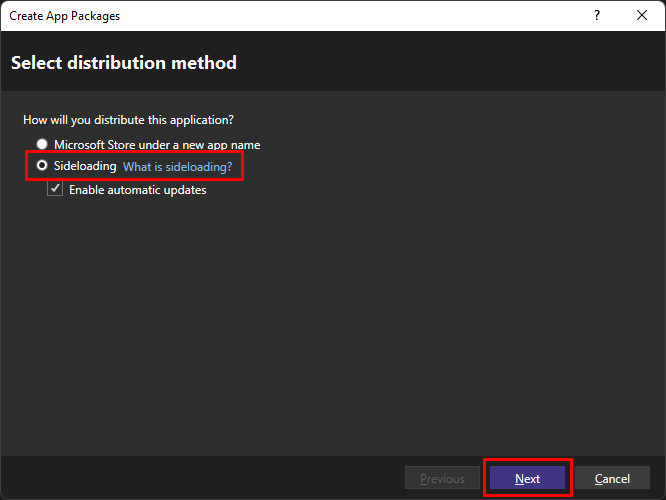
Solution Explorer에서 프로젝트 우클릭 후Publish선택Select distribution method : 실행된 창에서
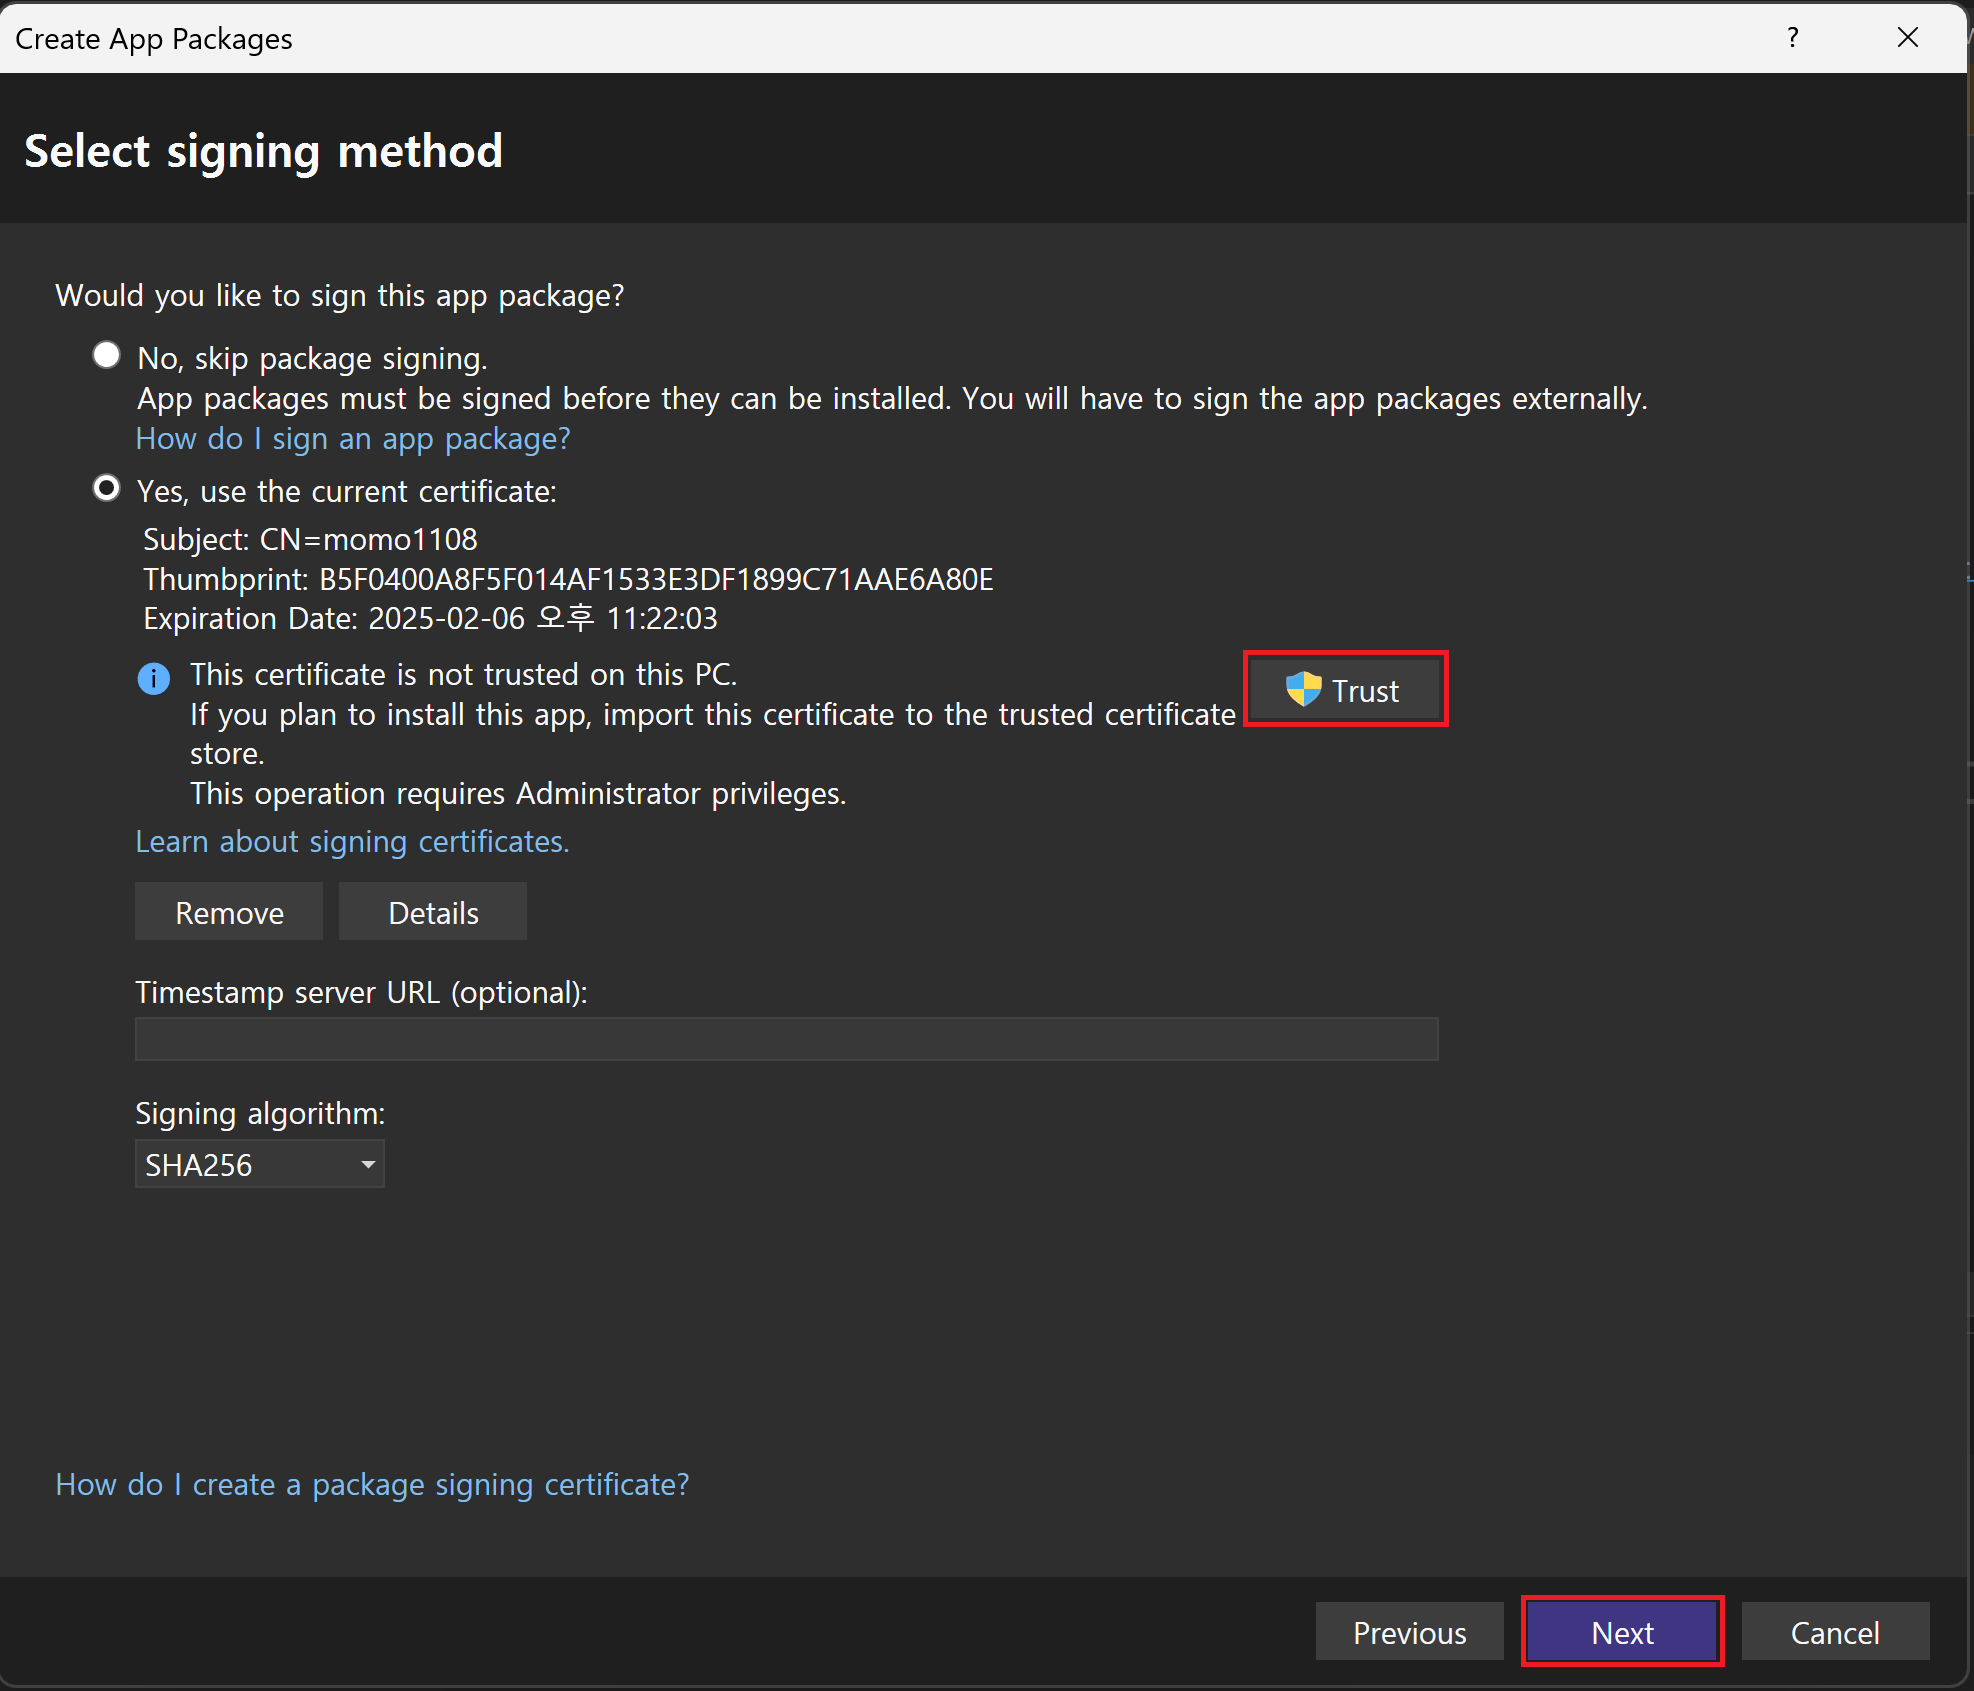
Sideloading선택 후Next클릭(Enable automatic updates 선택 시 뒤에서 설치 파일 경로를 명시해주어야 한다.)Select signing method :
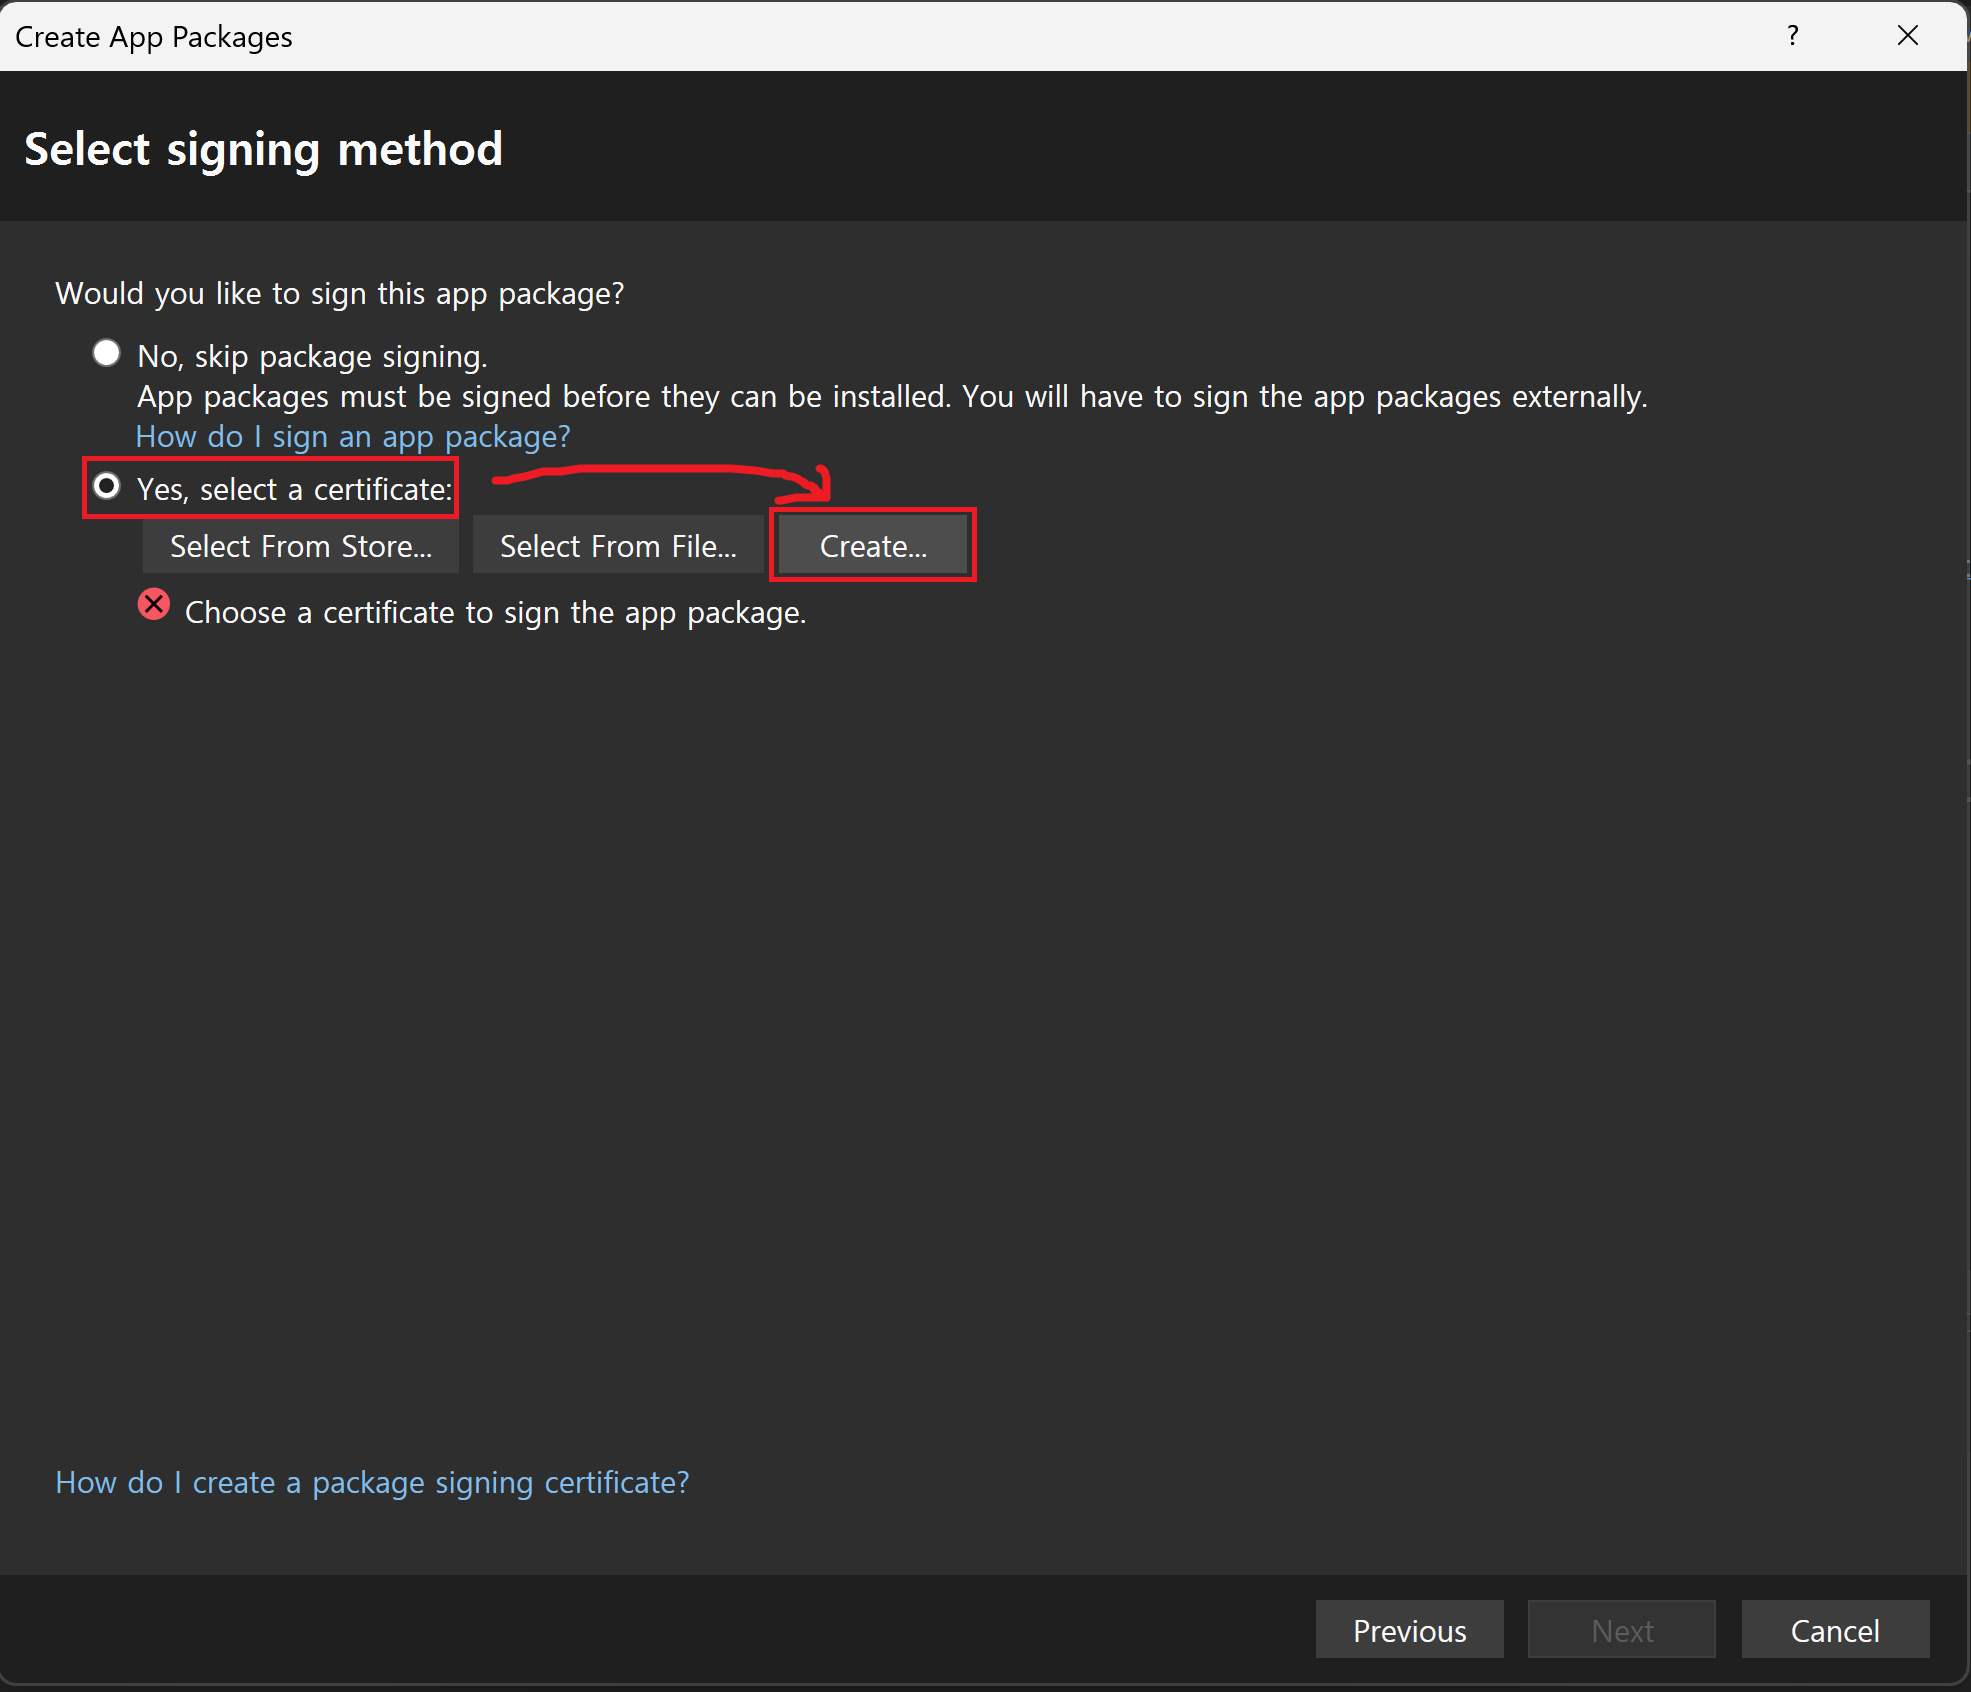
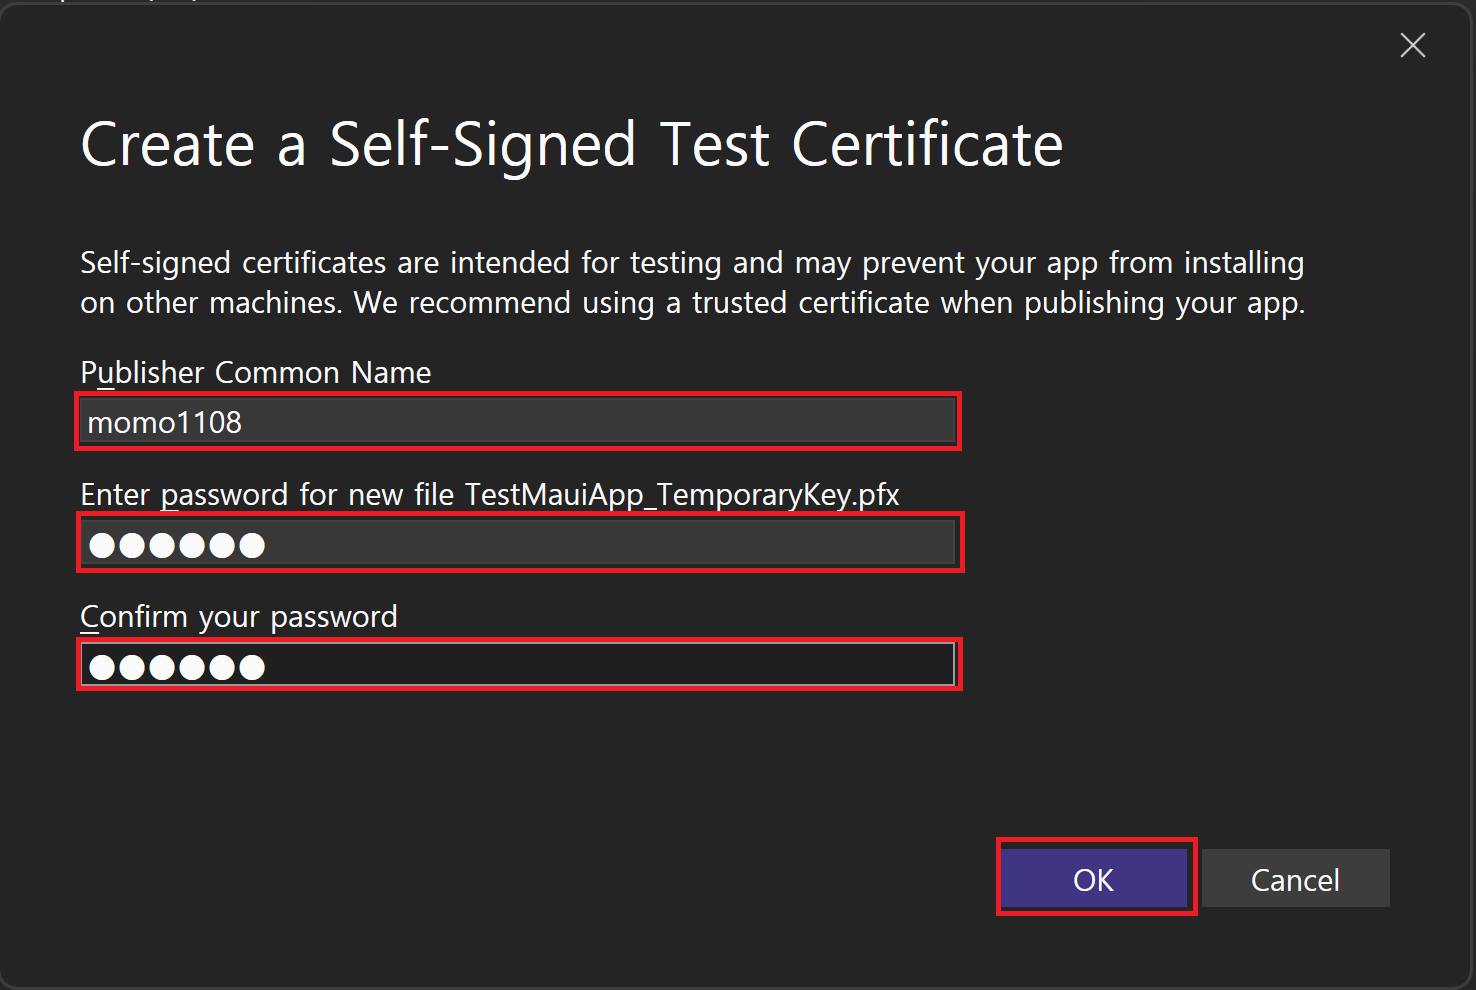
Yes, select a certificate선택 후Create버튼 클릭(임시 테스트용 인증서 생성)Create a Self-Signed Test Certificate : 퍼블리셔 이름과 인증서 파일의 패스워드 설정 후
OK클릭다시 Select signing method 창으로 돌아와서 인증서 옆의
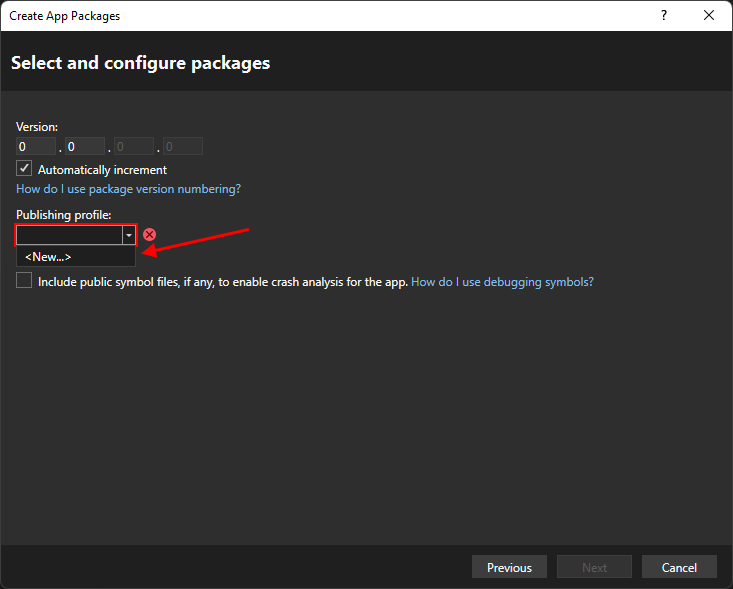
Trust버튼 클릭 후Next클릭Select and configure packages : 앱 패키지의 버전을 설정한다.(기본은
0.0.0.0)Automatically Increment체크박스는 publish 될 때 마다 버전을 올려준다.Publishing profile선택 후<New..>선택Create a new MSIX Publish Profile : Configuration 을
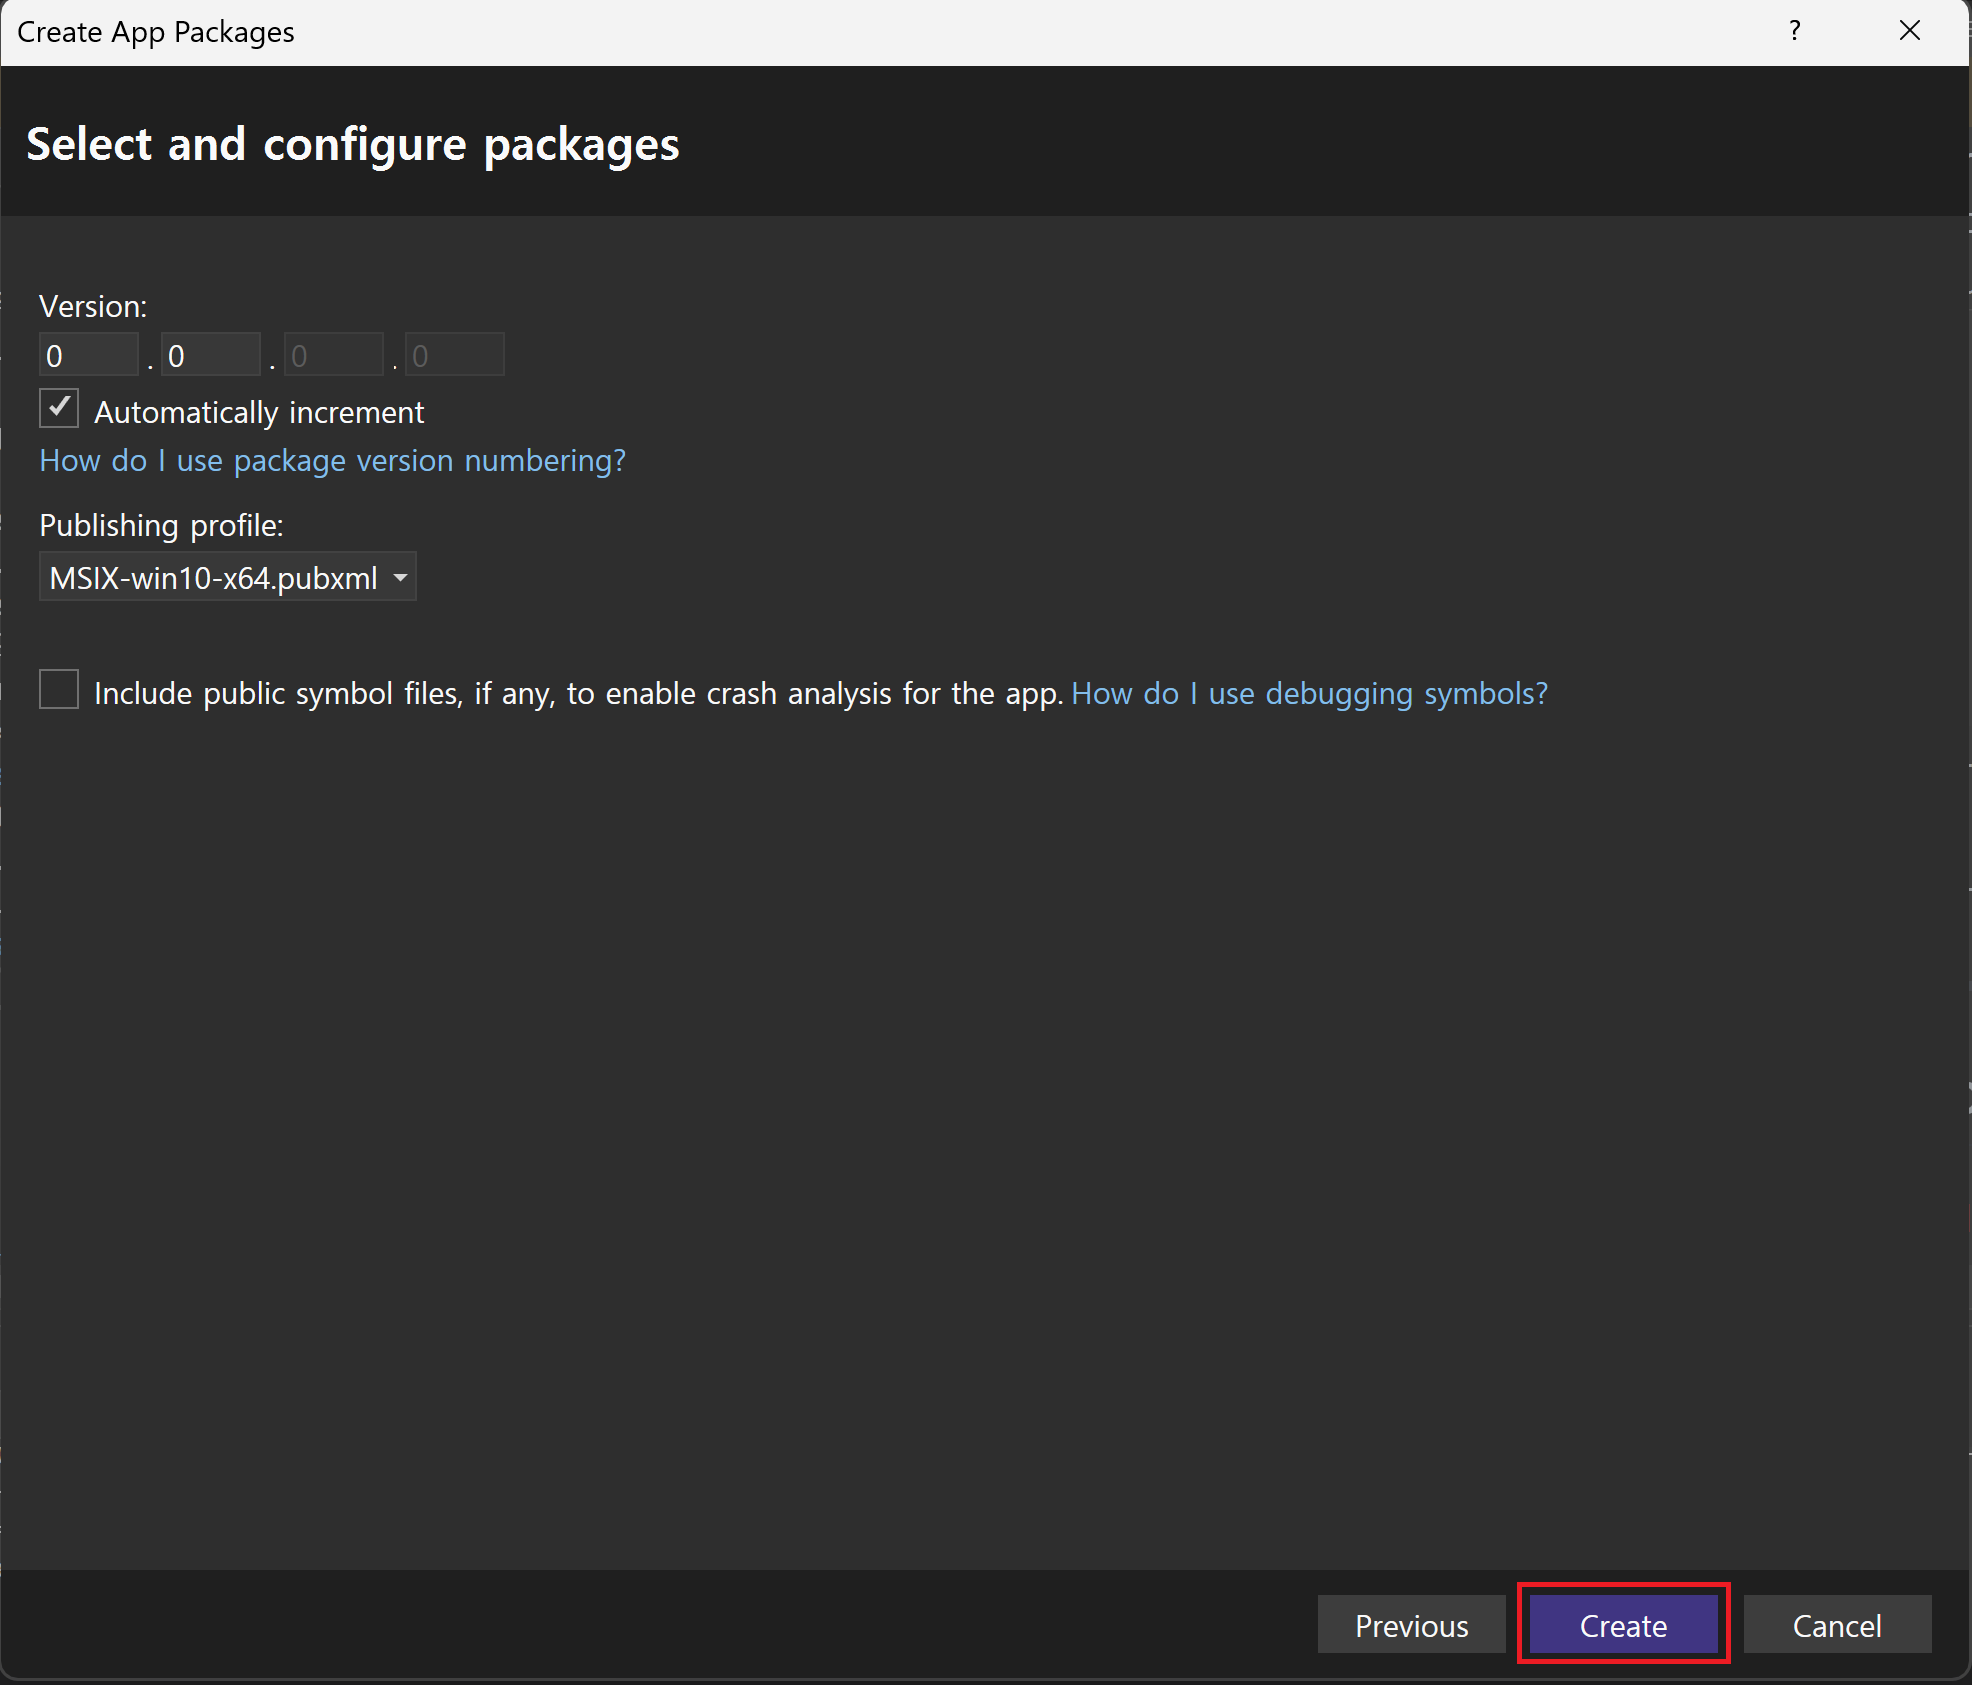
Release로 선택하고, Target Runtime 을win10-x64로 설정 후OK클릭만약 이전에
Enable automatic updates을 선택한 경우 여기서 installer 위치 설정이 진행된다.다시 Select and configure packages 창으로 돌아와서
Create버튼 클릭하면 끝.
위 방식의 한계점은 다음과 같다.
- 게시된 앱은 게시 폴더에서 실행 파일로 직접 실행하려고 하면 작동하지 않습니다.
- 앱을 실행하는 방법은 먼저 패키지된 MSIX 파일을 통해 설치하는 것입니다.
.NET CLI 를 사용하여 unpackaged app 배포하기
먼저 프로젝트의 빌드 세팅을 구성한다.
아래의 <PropertyGroup> 노드를 프로젝트 파일에 추가한다. 이 노드는 타겟 프레임워크가 Windows 이고 Release 로 설정됐을때만 처리된다.
1
2
3
<PropertyGroup Condition="$([MSBuild]::GetTargetPlatformIdentifier('$(TargetFramework)')) == 'windows' and '$(RuntimeIdentifierOverride)' != ''">
    <RuntimeIdentifier>$(RuntimeIdentifierOverride)</RuntimeIdentifier>
</PropertyGroup>
이제 Visual Studio 의 개발자 콘솔에서 프로젝트 폴더로 이동한다. 이후 dotnet publish 명령어를 실행하는데, 옵션은 아래를 참고하자.
| Parameter | Value |
|---|---|
-f | The target framework, which is net8.0-windows{version}. This value is a Windows TFM, such as net8.0-windows10.0.19041.0. Ensure that this value is identical to the value in the <TargetFrameworks> node in your .csproj file. |
-c | The build configuration, which is Release. |
-p:WindowsPackageType=None | Indicates to the publish command that there should be no package. |
-p:RuntimeIdentifierOverride=win10-x64 or -p:RuntimeIdentifierOverride=win10-x86 | Avoids the bug detailed in WindowsAppSDK Issue #3337. Choose the -x64 or -x86 version of the parameter based on your target platform. |
-p:WindowsPackageType | The package type, which is None for unpackaged apps. |
-p:WindowsAppSDKSelfContained | The deployment mode for your app, which can be framework-dependent or self-contained. This value should be true for self-contained apps. For more information about framework-dependent apps and self-contained apps, see Windows App SDK deployment overview. |
.NET MAUI Solution을 배포할 때 사용하는
dotnet publish커맨드는 우리 Solution 의 각 프로젝트들을 따로 배포하기 때문에, 우리 Solution 에 다른 프로젝트 타입들을 추가한 경우 문제가 발생할 수 있다. 따라서dotnet publish커맨드는 우리 .NET MAUI 프롲게트에 scope 되어야 한다. 원문 : Attempting to publish a .NET MAUI solution will result in thedotnet publishcommand attempting to publish each project in the solution individually, which can cause issues when you’ve added other project types to your solution. Therefore, thedotnet publishcommand should be scoped to your .NET MAUI app project.
.NET 8 버전에서
dotnet publish커맨드는 기본적으로Releaseconfiguration 으로 설정되어있다. 따라서 커맨드라인 명령어에서 이 build configuration 은 생략 가능하다. 원문 : In .NET 8, thedotnet publishcommand defaults to theReleaseconfiguration. Therefore, the build configuration can be omitted from the command line.
배포과정에서 앱이 빌드되고, 실행 파일이 bin\Release\net8.0-windows10.0.19041.0\win10-x64\publish 폴더에 복사된다. 이 폴더 안에는 exe 파일이 존재하며 이것이 빌드된 앱이다. 이 실행파일로 앱을 실행할 수 있고, 폴더 전체를 복사해서 다른 기기에서 실행할 수도 있다.
이렇게 빌드된 앱이 packaged app 과 다른점은 폴더 내에 .NET Runtime 이 포함되지 않는다는 점이다. 결국 앱을 실행하기 위해서는 먼저 실행하는 기기에 .NET Runtime 이 먼저 설치되어야 한다. 모든 런타임 구성요소들을 앱에 포함시키고 싶은 경우, 배포 명령어를 사용할 때 -p:WindowsAppSDKSelfContained 옵션을 추가하면 된다.
도큐먼트에서 제공되는 예시 명령어는 다음과 같다.
1
dotnet publish -f net8.0-windows10.0.19041.0 -c Release -p:RuntimeIdentifierOverride=win10-x64 -p:WindowsPackageType=None -p:WindowsAppSDKSelfContained=true
dotnet publish 커맨드의 자세한 정보는 dotnet publish 도큐먼트 를 참조하자.
이제 위의 내용을 정리하여 내 노트북과 프로젝트에 적용시켜 보자.
먼저 타겟 프레임워크를 설정해야 하는데 내 노트북은 윈도우11 이라 그냥 도큐먼트의 버전을 그대로 써보자.
그다음 build configuration 을 Release 로 설정하는 것은 .NET 8 부터 생략 가능하다고 하니 이것도 생략해보자.
64비트 컴퓨터로 사용할 것이니 -p:RuntimeIdentifierOverride=win10-x64 옵션을 사용하자. Unpackaged App 의 경우 -p:WindowsPackageType=None 을 사용하자.
-p:WindowsAppSDKSelfContained 옵션은 위에서 설명한대로 런타임의 포함여부를 설정하는데, 포함시키는 경우는 self-contained 제외하는 경우는 framework-dependent 라고 부른다.
두가지는 각각 장단점을 가지고 있다.
| Deploy framework-dependent | Deploy self-contained | |
|---|---|---|
| 장점 | Small deployment. Only your app and its other dependencies are distributed. The Windows App SDK runtime and Framework package are installed automatically by framework-dependent apps that are packaged; or as part of the Windows App SDK runtime installer by framework-dependent apps that are either packaged with external location or unpackaged. Serviceable. Servicing updates to the Windows App SDK are installed automatically via the Windows App SDK Framework package without any action required of the app. | Control Windows App SDK version. You control which version of the Windows App SDK is deployed with your app. Servicing updates of the Windows App SDK won’t impact your app unless you rebuild and redistribute it. Isolated from other apps. Apps and users can’t uninstall your Windows App SDK dependency without uninstalling your entire app. Xcopy deployment. Since the Windows App SDK dependencies are carried by your app, you can deploy your app by simply xcopy-ing your build output, without any additional installation requirements. |
| 단점 | Additional installation dependencies. Requires installation of the Windows App SDK runtime and/or Framework package, which can add complexity to app installation. Shared dependencies. Risk that shared dependencies are uninstalled. Apps or users uninstalling the shared components can impact the user experience of other apps that share the dependency. Compatibility risk. Risk that servicing updates to the Windows App SDK introduce breaking changes. While servicing updates should provide backward compatibility, it’s possible that regressions are introduced. | Larger deployments (unpackaged apps only). Because your app includes the Windows App SDK, the download size and hard drive space required are greater than would be the case for a framework-dependent version. Performance (unpackaged apps only). Slower to load, and uses more memory since code pages aren’t shared with other apps. Not serviceable. The Windows App SDK version distributed with your app can be updated only by releasing a new version of your app. You’re responsible for integrating servicing updates of the Windows App SDK into your app. |
일단 나는 포함시키는것으로 해보자. 크기는 좀 커지겠지만 확실한 방법이니..
완성된 나의 배포 명령어! dotnet publish -f net8.0-windows10.0.19041.0 -p:RuntimeIdentifierOverride=win10-x64 -p:WindowsPackageType=None -p:WindowsAppSDKSelfContained=true
실행하니 백신에 실행파일이 걸려서 복사에 실패했다…. 백신 끄고 다시해보자.
1분도 안돼서 완료됐다. 실행 결과는 프로젝트의 bin\Release\net8.0-windows10.0.19041.0\win10-x64\publish 경로에 생성된다. 실행파일을 실행해보니 잘 동작한다. 압축파일을 만들어서 집에서도 테스트해보자. 후후
집에서 실행해본 결과, .NET 환경 설치창이 자동으로 뜨더라. 런타임을 포함시킨다고 해도 기본적인 .NET 설치는 필요한가 보다.
Resources
- .NET MAUI 도큐먼트 : https://learn.microsoft.com/ko-kr/dotnet/maui/?view=net-maui-8.0
- 좋은 .NET MAUI 라이브러리, 리소스가 정리된 깃헙(awesome-dotnet-maui) : https://github.com/jsuarezruiz/awesome-dotnet-maui
